MVC Core Integration
Table of Contents
- MVC Core Integration
- Introduction
- Prerequisites
- Create Your MVC Core Starter Kit Application
- Copying Izenda Resources and References
- Configuring the Project Build
- Configuring the Script and Style Bundle
- Configuring the Routes
- Setting up the Database
- Configuring the Izenda API Service
- The first run of Izenda API Service
- Adding Izenda Boundary
- Custom Authentication Logic
- Run First Login
- Update Shared Layout
- Embedding Front-end Izenda (Izenda UI)
- Run Your Izenda Integrated Application
- Implement Register New Account
- Call Izenda API Service in C#
Introduction
This tutorial will teach you the basics of embedding Izenda into an ASP.NET MVC Core web application using Visual Studio 2017.
Download the completed project. This is important! You’ll need to use files and code samples from this codebase throughout the guide.
This starter kit will guide you through the implementation and deployment of the full integration mode, this means both front-end (UI) and back-end (API Service) are integrated into one MVC 5 application.
See more details for Deployment Mode 1: Back End Standalone, Front End Integrated.
Prerequisites
To complete this walkthrough, you will need the following:
- Visual Studio 2017
- .NET Core 2.2
- Izenda API package
- Izenda Embedded UI package
- Sql Server 2016
The Izenda API service is built on .NET framework 4.6.1 and Core 2.2, you can build your integrated application on .NET Framework 4.0 or higher and .NET Core 2.2, this document will guide you step by step on integrating Izenda into your application with .NET Core 2.2. Please note this guide was developed using the versions of each component specified above. For more details on supported components please see other sections in the Izenda documentation.
Create Your MVC Core Starter Kit Application
Open Visual Studio IDE then select menu New > New Project

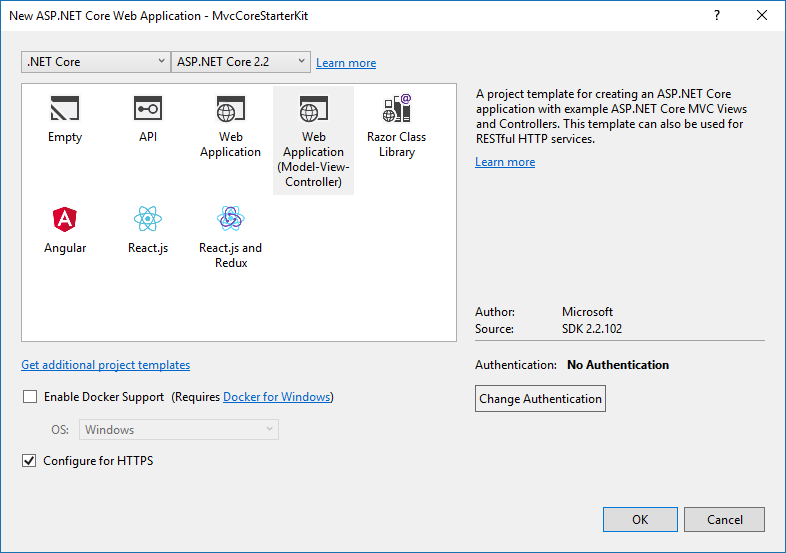
New ASP.NET Core Web Application
On New Project dialog, select Templates > Visual C# > Web then select target .NET Core Framework and ASP.NET Core Web Application.
Name your project “MvcCoreStarterKit” then click OK. This is important! It will affect reference names throughout the code base.
In the New ASP.NET Core Project dialog, choose .Net Core framework and ASP .NET Core 2.2 then click Web Application (Model-View-Controller).
MVC Core Template
The default template of MVC Core is created, you will use this template to implement Izenda integrated application from now.
Copying Izenda Resources and References
In Solution Explorer of MvcCoreStarterKit project, add new folders below:
- IzendaBoundary
- IzendaReferences
- IzendaResources
- wwwrootjsizenda
Copy Izenda Resource to starter kit project:
- Download and copy izendadb.config file into ~\MvcCoreStarterKit
- Download latest Izenda API package (API.zip) extract zip file and then:
- Copy all sub folders and files in ~\API\bin to ~ \MvcCoreStarterKit\IzendaReferences
- Copy 3 folders API\Content, API\EmailTemplates and API\Export to ~ \MvcCoreStarterKit\IzendaResources
- Download latest Izenda Embedded UI package (EmbeddedUI.zip), extract zip file then copy all sub folders and files to ~\MvcCoreStarterKit\Scripts\izenda
- Download izenda.integrate.js, izenda.utils.js and alertify.js then copy to ~\MvcCoreStarterKit\wwwrootjs
Configuring the Project Build
Add Izenda DLLs reference and other dependencies
Right click Reference node in MvcCoreStarterKit Solution Explorer then select Add Reference…
On Reference Manager dialog click Browse… button then browse to folder ~\MvcCoreStarterKit\IzendaReferences, select all DLL files having Izenda prefix and Rhino.License.dll file
Note
In this step if you encounter errors regarding reference conflicts, you must configure Redirecting Assembly as required or contact Izenda Support.
You also need to add System.ComponentModel.Composition.
Go to Add References again, Assemblies-> Framework and check System.ComponentModel.Composition.Finally, go to Tools->NuGet Packet Manager->Package Manager Console and run the following:
Install-Package Microsoft.AspNet.WebApi.Client
Adding post build events to copy the resources
Adding post build events to copy the resources Open Project Properties page select Build Events then click Edit Post-build… button and then enter the commands below into Post-build event command line box:
XCOPY /S /I /Y "$(ProjectDir)IzendaResources\Content" "$(TargetDir)Content\"
XCOPY /S /I /Y "$(ProjectDir)IzendaResources\EmailTemplates" "$(TargetDir)EmailTemplates\"
XCOPY /S /I /Y "$(ProjectDir)IzendaResources\Export" "$(TargetDir)Export\"
XCOPY /S /I /Y "$(ProjectDir)IzendaResources\Themes" "$(TargetDir)Themes\"
XCOPY /S /I /Y "$(ProjectDir)IzendaReferences\Resources" "$(TargetDir)bin\Resources\"
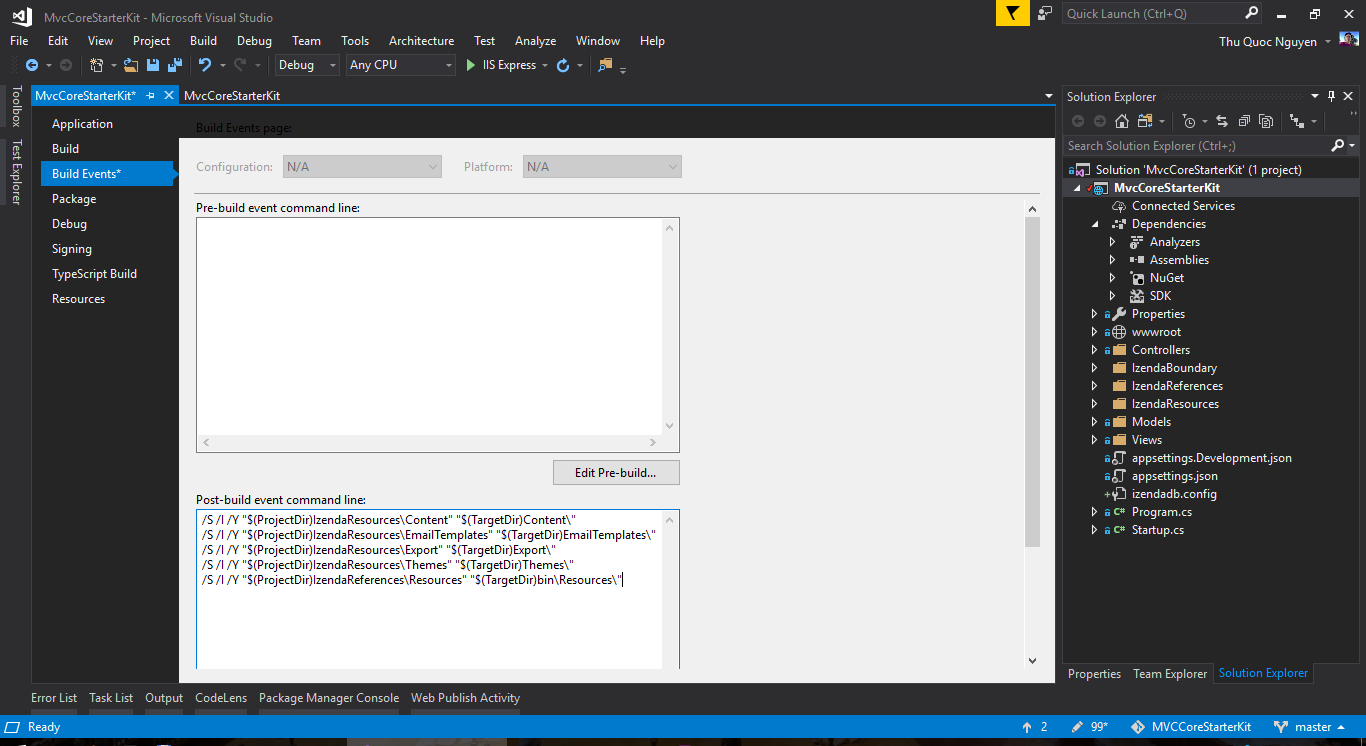
Copy Resources on Post build event
Configuring the Script and Style Bundle
Open ~\Views\Shared\_Layout.cshtml and add bundle script:
<head>
    <meta charset="utf-8" />
    <meta name="viewport" content="width=device-width, initial-scale=1.0" />
    <title>@ViewData["Title"] - MVCCoreStarterKit</title>
    <link href="~/css/bootstrap.min.css" rel="stylesheet" />
    <link rel="stylesheet" href="~/css/site.css" />
    <link href="~/css/izenda_visualizations.css" rel="stylesheet" />
    @* Apply css based on the users tenant *@
    <link href="~/js/izenda/izenda-ui.css" rel="stylesheet" />

    @*Add Custom CSS based on the tenantId and path set in izendaCssPath above *@
    <link href=@ViewBag.izendaCssPath rel="stylesheet">
</head>
Then add the below script:
        @RenderBody()
        <footer>
            <partial name="_CopyRight" />
        </footer>
    </div>
    <script rel="preload" src="~/js/jquery-1.10.2.min.js"></script>
    <script rel="preload" src="~/js/bootstrap.min.js"></script>
    <script rel="preload" src="~/js/site.js" asp-append-version="true"></script>
    <script rel="preload" src="~/js/alertify.js"></script>
    <script rel="prefetch" src="~/js/izenda/izenda_common.js"></script>
    <script rel="prefetch" src="~/js/izenda/izenda_locales.js"></script>
    <script rel="prefetch" src="~/js/izenda/izenda_vendors.js"></script>
    <script rel="prefetch" src="~/js/izenda/izenda_ui.js"></script>
    <script rel="prefetch" src="~/js/izenda.integrate.js"></script>
    <script rel="prefetch" src="~/js/izenda.utils.js"></script>
    <script rel="prefetch" src="~/js/izenda_visualizations.js"></script>
Configuring the Routes
Open ~\MvcCoreStarterKit\Startup.cs then modify the routing config as shown below:
            app.UseMvc(routes =>
            {
                routes.MapRoute("ReportPart", "viewer/reportpart/{id}", defaults: new { controller = "Home", action = "ReportPart" });
                routes.MapRoute("ReportViewer", "report/view/{id}", defaults: new { controller = "Report", action = "ReportViewer" });
                routes.MapRoute("DashboardViewer", "dashboard/edit/{id}", defaults: new { controller = "Dashboard", action = "DashboardViewer" });
                routes.MapRoute("izenda", "izenda", defaults: new { controller = "Home", action = "Izenda" });
                routes.MapRoute("izenda_settings", "izenda/settings", defaults: new { controller = "Home", action = "Izenda" });
                routes.MapRoute("izenda_new", "izenda/new", defaults: new { controller = "Home", action = "Izenda" });
                routes.MapRoute("izenda_dashboard", "izenda/dashboard", defaults: new { controller = "Home", action = "Izenda" });
                routes.MapRoute("izenda_report", "izenda/report", defaults: new { controller = "Home", action = "Izenda" });
                routes.MapRoute("izenda_reportviewer", "izenda/reportviewer", defaults: new { controller = "Home", action = "Izenda" });
                routes.MapRoute("izenda_reportviewerpopup", "izenda/reportviewerpopup", defaults: new { controller = "Home", action = "Izenda" });
                routes.MapRoute(
                    name: "default",
                    template: "{controller=Home}/{action=Index}/{id?}");
            });
            app.UseOwin(x => x.UseNancy(opt => opt.Bootstrapper = new CustomBootstraper()));
        }
    }

    public class CustomBootstraper : IzendaBootstraper
    {
        protected override IEnumerable<ModuleRegistration> Modules
        {
            get
            {
                var nancyType = typeof(INancyModule);
                var moduleTypes = typeof(IzendaBootstraper).Assembly.GetTypes()
                    .Where(x => !x.IsAbstract && x.GetInterfaces().Contains(nancyType))
                    .Select(x => new ModuleRegistration(x));
                return base.Modules.Concat(moduleTypes);
            }
        }
    }
}
The statement app.UseOwin(x => x.UseNancy(opt => opt.Bootstrapper = new CustomBootstraper())); and the CustomBootstraper class are important, do not miss it. This route will instruct MVC routine ignore any request API which is begin with api/ prefix (instead of response as Controller and View request, it will treat as API Service request), and this prefix must be same with value of Izenda API prefix setting <add key="izendaapiprefix" value="api" /> that you will config in section Izenda API Service Hosting Config later.
Some of the routing configuration may seem strange, but they will be explained later. The table below details the purpose of each URL route:
| Name | URL | Description |
|---|---|---|
| ReportPart | viewer/reportpart/{id} | This route is used by Izenda BE Service to capture html content of report party type chart, gauge or map. Mostly used for report exporting function |
| ReportViewer | report/view/{id} | This route is used by Izenda BE Service to capture report content in html format. It is using in exporting report content to embedded html and send it to email (send to email directly or send by report subscription function) |
| DashboardViewer | dashboard/view/{id} | The route used by Izenda BE Service to capture dashboard content in html format. Using for exporting dashboard content to email. |
| CustomAuth | api/user/login | The route used by the CopyConsole tool to login to your integrated Izenda API for executing Copy Management feature. |
Setting up the Database
In this starter kit, we use SQL Server for the database server. Izenda supports many database engines such as: [MSSQL] SQL Server, [AZSQL] AzureSQL, [MYSQL] MySQL, [ORACL] Oracle and [PGSQL] PostgreSQL. The steps to setting up these databases are similar.
Create Izenda DB
On your SQL Server create an empty database named IzendaMvc. This database stores Izenda data (report definitions, dashboards, etc.) and the configuration necessary to run Izenda.
Download IzendaMvc.sql then execute on IzendaMvc database to generate the schema and default data.
Updating the Izenda DB
The IzendaMvc.sql script will generate a configuration database for Izenda 1.24.4.
If you use an EmbeddedUI and API for a later version of Izenda you will need to run update scripts against your IzendaMvc database.
Upgrade scripts can be compiled and downloaded using the Schema Migration Assistant . Here, you will specify your current version (1.24.4) and your target version for upgrade and download the resulting SQL script.
Create Authentication DB
On your SQL Server create an empty database named MvcCoreStarterKit. This database is used for storing user authentication information. In your real integrated application, it can be replaced by your system database with your custom user credential information.
Download MvcCoreStarterKit.sql and execute on MvcCoreStarterKit database to create schema and default user authentication settings.
Verifying Izenda DB and Authentication DB
After creating the IzendaDB, select all rows in the IzendaSystemSetting table and verify that the values are the same as below:
| Name | Value | Description |
|---|---|---|
| DeploymentMode | 3 | The setting for deployment mode, in this starter kit it is fully integrated. |
| WebUrl | http://localhost:14809/ | The setting value must be base address of your front-end web page url. |
Next you must ensure the UserName value of records in AspNetUsers table in MvcCoreStarterKit DB must be matched with UserName value in IzendaUser table of IzendaMvc DB.
Configuring the Izenda API Service
The full configuration files web.config and appsettings.json of Izenda API Service are available on GitHub.
Izenda API Service Hosting Config
Open the MvcCoreStarterKit\Web.config and add below Izenda setting key into <appSettings> node:
  <appSettings>
    <add key="webpages:Version" value="3.0.0.0" />
    <add key="webpages:Enabled" value="false" />
    <add key="ClientValidationEnabled" value="true" />
    <add key="UnobtrusiveJavaScriptEnabled" value="true" />
    <!--Izenda-->
    <add key="izendaapiprefix" value="api" />
    <add key="izedapassphrase" value="vqL7SF+9c9FIQEKUOhSZapacQgUQh" />
    <add key="IzendaApiUrl" value="http://localhost:14809/api/" />
    <add key="izusername" value="IzendaAdmin@system.com" />
    <add key="iztenantname" value="" />
    <!--Izenda End-->
  </appSettings>
| Key Name | Value | Description |
|---|---|---|
izendaapiprefix |
api | This is prefix of your Izenda API service, it is used for distinguish the Izenda API with other api in your application if it expose more than one service endpoint. |
izendapassphrase |
vqL7SF+9c9FIQEKUOhSZapacQgUQh | The key used for encryption |
IzendaApiUrl |
http://localhost:14809/api/ | Your Izenda API endpoint, used to call the Izenda API in your .NET code |
izusername |
IzendaAdmin@system.com | Default system level account, in this kit it is used for authentication of specific functions like adding new users, updating the data model, etc. This value must match with the Username in MvcCoreStarterKit.AspNetUsers table and IzendaMvc.IzendaUser table |
iztenantname |
The tenant of system level account, have same purpose with izusername |
In <system.webServer> config node, add below config:
    <system.webServer>
      <handlers>
        <add name="aspNetCore" path="*" verb="*" modules="AspNetCoreModule" resourceType="Unspecified" />
      </handlers>
      <aspNetCore requestTimeout="00:20:00" processPath="dotnet" arguments=".\MVCCoreStarterKit.dll" stdoutLogEnabled="false" stdoutLogFile=".\logs\stdout" hostingModel="InProcess" />
	  <modules runAllManagedModulesForAllRequests="true">
        <remove name="WebDAVModule"/> <!-- ADD THIS -->
    </modules>
    </system.webServer>
Logging Config
In <configSections> add a new section named name=”log4net” to config logging for Izenda API.
Then add log4net node below:
  <log4net threshold="ALL" debug="false">
    <root>
      <appender-ref ref="OutputDebugStringAppender" />
      <appender-ref ref="RollingFileAppender" />
    </root>

    <logger name="MVCCoreStarterKit" additivity="false">
      <level value="ALL" />
      <appender-ref ref="MVCCoreStarterKit" />
    </logger>

    <appender name="RollingFileAppender" type="log4net.Appender.RollingFileAppender,log4net, Version=1.2.15.0, Culture=neutral, PublicKeyToken=669e0ddf0bb1aa2a">
      <filter type="log4net.Filter.LevelRangeFilter, log4net, Version=1.2.15.0, Culture=neutral, PublicKeyToken=669e0ddf0bb1aa2a">
        <levelMin value="INFO" />
      </filter>
      <file value="logs\izenda-log.log" />
      <appendToFile value="true" />
      <rollingStyle value="Composite" />
      <datePattern value="yyyyMMdd" />
      <staticLogFileName value="true" />
      <preserveLogFileNameExtension value="true" />
      <maximumFileSize value="5MB" />
      <maxSizeRollBackups value="1000" />
      <layout type="log4net.Layout.PatternLayout,log4net, Version=1.2.15.0, Culture=neutral, PublicKeyToken=669e0ddf0bb1aa2a">
        <param name="ConversionPattern" value=" %date [%-5thread][%-5level][%-36logger{1}] %message %newline" />
      </layout>
    </appender>

    <appender name="MVCCoreStarterKit" type="log4net.Appender.FileAppender">
      <file value="logs\mvccorekit-log.log" />
      <appendToFile value="true" />
      <layout type="log4net.Layout.PatternLayout">
        <conversionPattern value="%date [%-5level] %message%newline" />
      </layout>
    </appender>

    <appender name="OutputDebugStringAppender" type="log4net.Appender.OutputDebugStringAppender,log4net, Version=1.2.15.0, Culture=neutral, PublicKeyToken=669e0ddf0bb1aa2a">
      <layout type="log4net.Layout.PatternLayout,log4net, Version=1.2.15.0, Culture=neutral, PublicKeyToken=669e0ddf0bb1aa2a">
        <param name="ConversionPattern" value="[%-5level][%-24logger{1}/%line] %message (/T:%thread /D:%date) %newline" />
      </layout>
    </appender>
  </log4net>
Configuring Database Connection
Open ~\ MvcCoreStarterKit\izendadb.config then update the connection string to your IzendaMvc DB which was created in the steps above. For example with [MSSQL] SQLServer:
{"ServerTypeId":"572bd576-8c92-4901-ab2a-b16e38144813","ServerTypeName":"[MSSQL] SQLServer","ConnectionString":"[your connection string to IzendaMvc]","ConnectionId":"00000000-0000-0000-0000-000000000000"}
The ServerTypeName would be one of [MSSQL] SQL Server, [AZSQL] AzureSQL, [MYSQL] MySQL, [ORACL] Oracle and [PGSQL] PostgreSQL.
| DatasourceName | Id |
|---|---|
| [AZSQL] AzureSQL | d968e96f-91dc-414d-9fd8-aef2926c9a18 |
| [MYSQL] MySQL | 3d4916d1-5a41-4b94-874f-5bedacb89656 |
| [ORACL] Oracle | 93942448-c715-4f98-85e2-9292ed7ca4bc |
| [PGSQL] PostgreSQL | f2638ed5-70e5-47da-a052-4da0c1888fcf |
| [MSSQL] SQLServer | 572bd576-8c92-4901-ab2a-b16e38144813 |
For starter kit authentication database open ~\MvcCoreStarterKit\Web.config then modify the DefaultConnection value in connectionStrings node:
  <connectionStrings>
    <add name="DefaultConnection" connectionString="[your connection string to MvcCoreStarterKit]" providerName="System.Data.SqlClient" />
  </connectionStrings>
The first run of Izenda API Service
64-bit Oracle DLL Dependencies
If you encounter an error related to OracleDataAccesssDTC in Visual Studio navigate to Tools -> Options -> Projects and Solutions -> Web Projects -> Turn on Use the 64 bit version of IIS Express for web sites and projects.
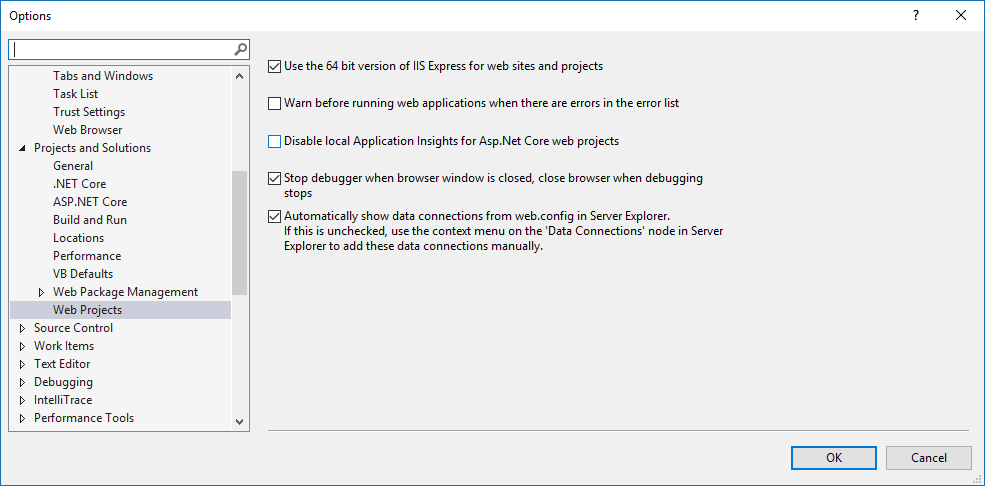
64-bit IIS Express
Run Starter Kit
In Visual Studio you can press F5 to run your starter kit for the first time, the application page will look like the screenshot below:

Starter kit screen
There is nothing present from the Izenda UI at this time. At this step we are just checking whether Izenda API is able to start up completely or not. On your browser address add /api/ to the end of url (http://localhost:14809/api/) then press enter, you will see Izenda API is hosted completely:
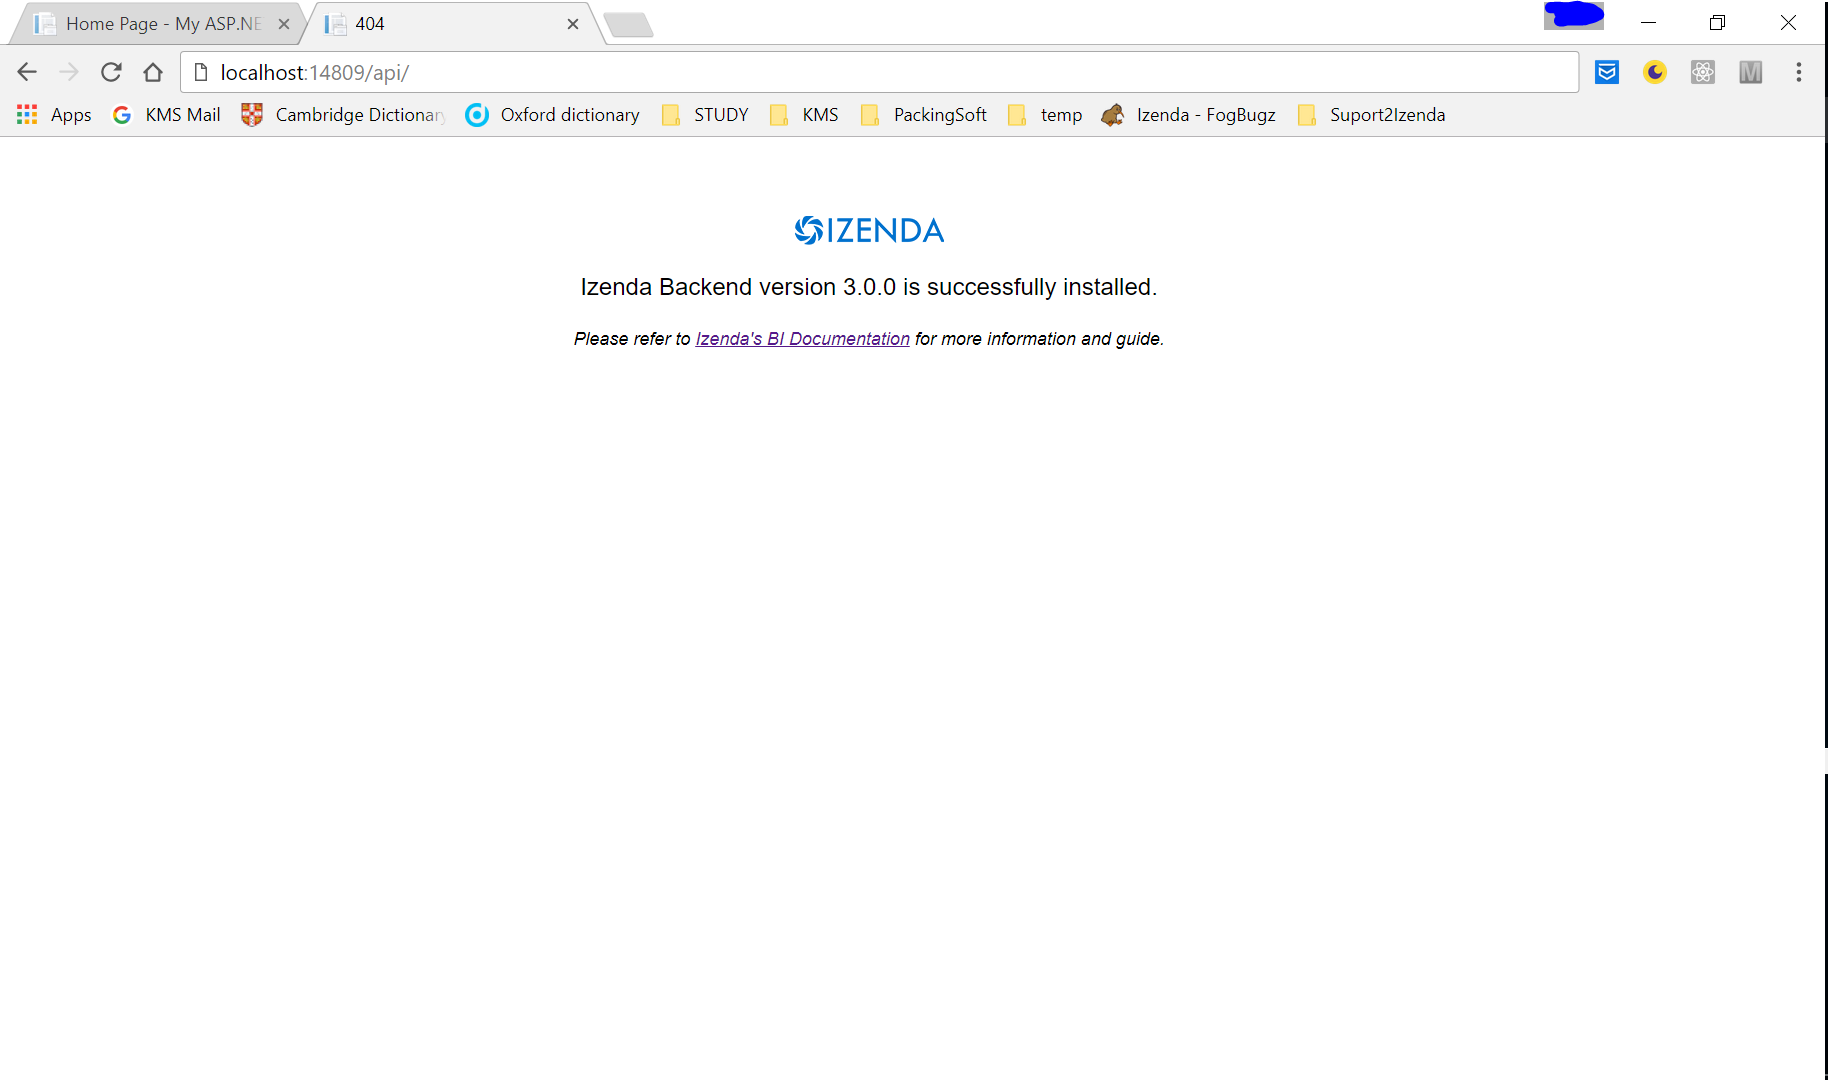
Landing Page
In ~\MvcCoreStarterKit project folder you will see a logs folder with the log files mvccorekit-log.log (~\MvcCoreStarterKit\logs).
Izenda API Hosting Troubleshooting
If you do not see logs file and landing page above check following:
- Nany hosting configuration in appsettings.json
- Check your routing configuration in startup.cs
Adding Izenda Boundary
Get all files in IzendaBoundary folder from GitHub repository then include into MvcCoreStarterKit project. Build the project, if there are any errors regarding missing references, update the references as needed.
The table below describes the functionality of each source code file:
| File and Folder | Classes | Description |
|---|---|---|
| Models | Model Entity | The definition of transferring model data which is used when communicating between your code and Izenda API. |
| CustomAdhocReport.cs | CustomAdhocReport | The IAdHocExtension is used to override many default functions in your Izenda installation. This extension will be automatically injected into the runtime by the Izenda API application. More information on this can be found here |
| IzendaTokenAuthorization.cs | IzendaTokenAuthorization | The helper class to decrypt and deserialize authentication token to UserInfo object and vice versa (serialize UserInfo object then encrypt to token key). |
| IzendaUtility.cs | IzendaUtility | Helper class to get list of data connection info for specific tenant. |
| StringCipher.cs | StringCipher | The helper class to encrypt and decrypt string value. |
| WebAPIService.cs | WebAPIService | The service proxy class supports to call to Izenda API Service. |
These classes just demonstrate simple examples of using each functionality. It is recommended that in your actual integration you use security best practices that follow your organizations established security policies and procedures.
Custom Authentication Logic
In this starter kit, we use simple authentication with username, password and tenant info. Basically, authorization logic (role, permissions …etc.) will depend on implementation of Izenda backend.
In MvcCoreStarterKit database we add a table named Tenants and add a column named TenantID into AspNetUsers table, this new column is a foreign key reference to the Tenants table which demonstrates a one to many relationship between Tenant and User. Other tables are kept same as ASP.NET MVC 5 template, that helps us modify login logic at little as possible, but allows us to show a simple use case for multi-tenant support.

Users and Tenants
In integrated mode, authentication is handled by the MVC Core application, not Izenda. In this starter kit, the Izenda backend will get a token via the UserIntegrationConfig.GetAccessToken method. You must implement your own code logic to provide this token containing the authenticated user’s information. To ensure security, each request to the Izenda API service will call back to MVC application to validate the token it received from the originating request. You must provide this validation logic in your app inside the UserIntegrationConfig.ValidateToken method. The diagram below illustrates the token retrieval and validation process in fully integrated mode:
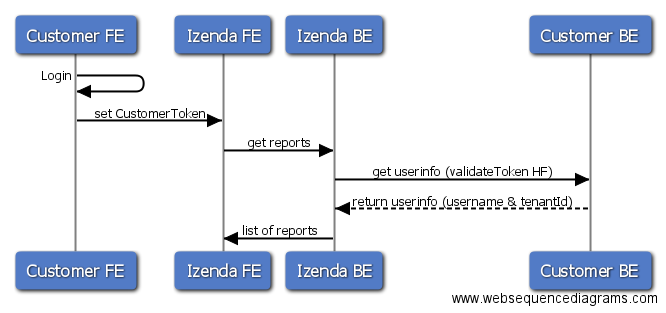
Authentication Sequence Diagram
To customize the authentication logic, we must modify some existing classes in the ASP.NET MVC Core application template. The table below lists all the modified classes:
| File | Class | State | Description |
|---|---|---|---|
| IzendaConfig.cs | IzendaConfig | New | The extension class provides Izenda token and token validation for the Izenda backend. |
| Areas\Identity\Model\IzendaUser.cs | ApplicationUser | New | The entity class present user identity model. This model maps to AspNetUsers table. |
| Areas\Identity\Model\Tenant.cs | Tenant | New | The entity model presents a tenant, maps to Tenants table. |
| Data\ApplicationDbContext.cs | ApplicationDBContext | New | Entity Framework DB context. |
| Areas\Identity\ApplicationUserManager.cs | ApplicationUserManager | New | Manage authentication user and login context. |
| Areas\Identity\ApplicationSignInManager.cs | ApplicationSignInManager | New | Custom sign in logic. |
| Areas\Identity\Pages\Account\Login.cshtml.cs | LoginModel | New | Custom login logic |
| Areas\Identity\Pages\Account\Logout.cshtml.cs | LogoutModel | New | Custom logout logic |
| Areas\Identity\Pages\Account\Register.cshtml.cs | RegisterModel | New | Custom register logic |
| Areas\Identity\ApplicationUserClaimsPrincipalFactory.cs | ApplicationUserClaimsPrincipalFactory | New | Handle user identity |
IzendaConfig
Create IzendaConfig.cs file within the top level of the project and implement subscription for UserIntegrationConfig.GetAccessToken action and UserIntegrationConfig.ValidateToken action.
    public static class IzendaConfig
    {
        public static void RegisterLoginLogic()
        {
            //This is used for exporting only
            UserIntegrationConfig.GetAccessToken = (args) =>
            {
                return IzendaTokenAuthorization.GetToken(new UserInfo()
                {
                    UserName = args.UserName,
                    TenantUniqueName = args.TenantId
                });
            };

            UserIntegrationConfig.ValidateToken = (ValidateTokenArgs args) =>
            {
                var token = args.AccessToken;
                var user = IzendaTokenAuthorization.GetUserInfo(token);

                // TenantUniqueName corresponds to the 'TenantID' field in the IzendaTenant table
                return new ValidateTokenResult { UserName = user.UserName, TenantUniqueName = user.TenantUniqueName };
            };
        }
    }
Action UserIntegrationConfig.GetAccessToken will convert user info to a token value.
Action UserIntegrationConfig.ValidateToken convert access token to user info.
IzendaUser and ApplicationUserClaimsPrincipalFactory
Open Areas\IdentityModel\IzendaUser.cs
Add the following namespaces so that it appears as below:
using Microsoft.AspNetCore.Identity;
using System.ComponentModel.DataAnnotations.Schema;
Add Tenant_Id property like below:
    public class IzendaUser : IdentityUser
    {
        public int Tenant_Id { get; set; }
        [ForeignKey("Tenant_Id")]
        public Tenant Tenant { get; set; }
    }
}
Open Areas\IdentityApplicationUserClaimsPrincipalFactory.cs
Add the following namespaces so that it appears as below:
using Microsoft.AspNetCore.Identity;
using Microsoft.Extensions.Options;
using MVCCoreStarterKit.Areas.Identity.Model;
using System.Linq;
using System.Security.Claims;
using System.Threading.Tasks;
Add custom claim identity like below:
        protected override async Task<ClaimsIdentity> GenerateClaimsAsync(IzendaUser user)
        {
            var identity = await base.GenerateClaimsAsync(user);

            var tenant = user.Tenant;
            if (user.Tenant != null)
            {
                identity.AddClaims(new[] {
                    new Claim("tenantName",tenant.Name),
                    new Claim("tenantId",tenant.Id.ToString()),
                });
            }
            var role = await UserManager.GetRolesAsync(user);
            identity.AddClaim(new Claim(ClaimsIdentity.DefaultRoleClaimType, role.FirstOrDefault()));

            return identity;
        }
The ApplicationUser class represents the user model and maps to AspNetUsers table. The Tenant_Id property is the foreign key reference to the tenant of the user. In the GenerateClaimsAsync method we add tenantId into user identity, this value will be used to establish “claims” based on the user’s tenant.
Tenant
- Open Areas\Identity\Model\Tenant.cs.
- Add a new Tenant class to represent a tenant object. This class is an entity model that maps to the Tenants table. The example below utilizes a very simple tenant model. You can customize this model to store more complex information.
1 2 3 4 5 6 7 8 | namespace MVCCoreStarterKit.Areas.Identity.Model
{
public class Tenant
{
public int Id { get; set; }
public string Name { get; set; }
}
}
|
ApplicationDBContext
This is the Entity Framework DB context of the entire authentication database. Because we added a new Tenants table, we must update the DB context to set of Tenant into this class.
    public class ApplicationDbContext : IdentityDbContext<IzendaUser>
    {
        public DbSet<Tenant> Tenants { get; set; }


        public ApplicationDbContext(DbContextOptions<ApplicationDbContext> options)
            : base(options)
        {
        }


        protected override void OnModelCreating(ModelBuilder builder)
        {
            base.OnModelCreating(builder);
            // Customize the ASP.NET Identity model and override the defaults if needed.
            // For example, you can rename the ASP.NET Identity table names and more.
            // Add your customizations after calling base.OnModelCreating(builder);
        }
    }
ApplicationUserManager
Open Areas\Identity\ApplicationUserManager.cs
Add the following namespaces so that it appears as below:
using Microsoft.AspNetCore.Identity;
using Microsoft.EntityFrameworkCore;
using Microsoft.Extensions.Logging;
using Microsoft.Extensions.Options;
using MVCCoreStarterKit.Areas.Identity.Model;
using MVCCoreStarterKit.Data;
using System;
using System.Collections.Generic;
using System.Linq;
using System.Threading.Tasks;
Add a new method
FindTenantUserAsync. This will be used to query and retrieve users by tenant, username, and password.public async Task<IzendaUser> FindTenantUserAsync(string tenant, string username, string password) { var user = await dbContext.Users .Include(x => x.Tenant) .Where(x => x.UserName.Equals(username, StringComparison.InvariantCultureIgnoreCase)) .Where(x => x.Tenant.Name.Equals(tenant, StringComparison.InvariantCultureIgnoreCase)) .SingleOrDefaultAsync(); if (await CheckPasswordAsync(user, password)) return user; return null; }
ApplicationSignInManager
Open Areas\Identity\ApplicationSignInManager.cs
Add the following namespaces so that it appears as below:
using Microsoft.AspNetCore.Authentication;
using Microsoft.AspNetCore.Http;
using Microsoft.AspNetCore.Identity;
using Microsoft.Extensions.Logging;
using Microsoft.Extensions.Options;
using MVCCoreStarterKit.Areas.Identity.Model;
using System.Threading.Tasks;
Add a new method
PasswordSigninAsyncto customize sign in logic. This method utilizes the FindTenantUserAsync method added above to find a user with the specified username, password and tenant.public async Task<bool> PasswordSignInAsync(string tenant, string username, string password, bool remember) { var user = await (UserManager as ApplicationUserManager).FindTenantUserAsync(tenant, username, password); if (user != null) { await SignInAsync(user, remember); return true; } return false; }
Account
- Open Areas\Identity\Pages\Account\Login.cshtml.cs
- In Login POST method, implement the ApplicationSignInMangager/PasswordSigninAsync method as shown below.
        public async Task<IActionResult> OnPostAsync(string returnUrl = null)
        {
            returnUrl = returnUrl ?? Url.Content("~/");

            if (ModelState.IsValid)
            {
                // This doesn't count login failures towards account lockout
                // To enable password failures to trigger account lockout, set lockoutOnFailure: true
                var result = await _signInManager.PasswordSignInAsync(Input.Tenant, Input.Email, Input.Password, Input.RememberMe);
                if (result)
                {
                    _logger.LogInformation("User logged in.");
                    return LocalRedirect(returnUrl);
                }
                else
                {
                    ModelState.AddModelError(string.Empty, "Invalid login attempt.");
                    return Page();
                }
            }

            // If we got this far, something failed, redisplay form
            return Page();
        }
UserInfo
- Create Models\UserInfo.cs
- Add the following:
namespace MVCCoreStarterKit.Models
{
    public class UserInfo
    {
        public string UserName { get; set; }

        // This corresponds to the 'TenantID' field in the IzendaTenant table
        public string TenantUniqueName { get; set; }
    }
}
InputModel
- Open Areas\Identity\Pages\Account\Login.cshtml.cs and Areas\Identity\Pages\Account\Register.cshtml.cs
- Add public class
InputModelso that it appears as below.
        public class InputModel
        {
            [Required]
            [DataType(DataType.Text)]
            public string Tenant { get; set; }

            [Required]
            [EmailAddress]
            public string Email { get; set; }

            [Required]
            [DataType(DataType.Password)]
            public string Password { get; set; }

            [Display(Name = "Remember me?")]
            public bool RememberMe { get; set; }
        }
Update Login Page
- Open Views\Account\Login.cshtml.
- Replace the contents of this file with the following from the GitHub MVCCoreStarterKit equivalent. This will add a Tenant section to the login page.
            <form id="account" method="post">
                <h4>Use a local account to log in.</h4>
                <hr />
                <div asp-validation-summary="All" class="text-danger"></div>
                <div class="form-group">
                    <label asp-for="Input.Tenant"></label>
                    <input asp-for="Input.Tenant" class="form-control" />
                    <span asp-validation-for="Input.Tenant" class="text-danger"></span>
                </div>
                <div class="form-group">
                    <label asp-for="Input.Email"></label>
                    <input asp-for="Input.Email" class="form-control" />
                    <span asp-validation-for="Input.Email" class="text-danger"></span>
                </div>
                <div class="form-group">
                    <label asp-for="Input.Password"></label>
                    <input asp-for="Input.Password" class="form-control" />
                    <span asp-validation-for="Input.Password" class="text-danger"></span>
                </div>
                <div class="form-group">
                    <div class="checkbox">
                        <label asp-for="Input.RememberMe">
                            <input asp-for="Input.RememberMe" />
                            @Html.DisplayNameFor(m => m.Input.RememberMe)
                        </label>
                    </div>
                </div>
                <div class="form-group">
                    <button type="submit" class="btn btn-primary">Log in</button>
                </div>
                <div class="form-group">
                    <p>
                        <a id="forgot-password" asp-page="./ForgotPassword">Forgot your password?</a>
                    </p>
                    <p>
                        <a asp-page="./Register" asp-route-returnUrl="@Model.ReturnUrl">Register as a new user</a>
                    </p>
                </div>
            </form>
Run First Login
Press F5 to run application, navigate to login page and enter the values below for the respective fields:
- Tenant = System
- Email = IzendaAdmin@system.com
- Password = Izenda@123
Then click Login. You will see the home page with the logged in user’s email on top right of the page.
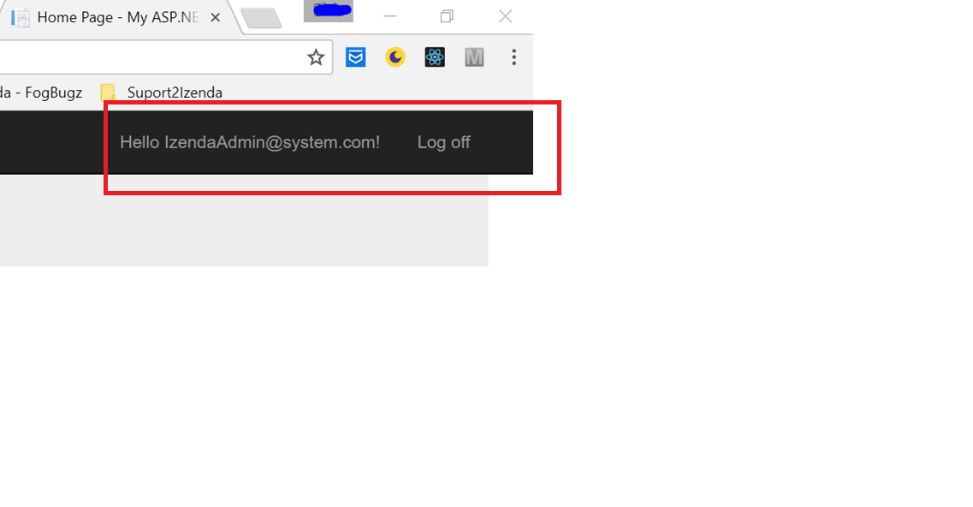
Current user and Log off button
Embedding Front-end Izenda (Izenda UI)
Embedding Izenda full page
In the HomeController add a new action named Izenda and then create the view Izenda.cshtml for it.
public ActionResult Izenda()
{
return View();
}
This action is used to embedded the entire Izenda application into one view. The Izenda/* routes are subroutes inside of the fully embedded Izenda page.
In the Izenda.cshtml view, call function izendaInit(), which is defined in ~\Scripts\izenda.integrate.js. The full Izenda UI will be rendered when opening this page, including Report, Dashboard and Setting page.
@{
ViewBag.Title = "Izenda";
}
@*@section title{ Izenda }*@
@*@section customHeader{}*@
@section scripts
{
<script type="text/javascript">
$(document).ready(function () {
izendaInit();
});
</script>
}
<div class="loader" id="progressLoader"> </div>
<div class="izenda-container" id="izenda-root"></div>
We have 2 empty div elements for each Izenda page, the loader div is used for display progress bar when the page is waiting for response from Izenda back-end, the div izenda-container is the container for Izenda page content.
Embedding Specific Izenda Pages
Embedding the Izenda Settings Page
Create the Settings action in the HomeController
public ActionResult Settings()
{
return View();
}
The settings page view Settings.cshtml:
@{
ViewBag.Title = "Settings";
}
@*@section title{ Izenda }*@
@*@section customHeader{}*@
@section scripts
{
<script type="text/javascript">
$(document).ready(function () {
izendaInitSetting();
});
</script>
}
<div class="loader" id="progressLoader"> </div>
<div class="izenda-container" id="izenda-root"></div>
Embedding the Izenda Report List Page
Create the Reports action in HomeController
public ActionResult Reports()
{
return View();
}
The report list view Reports.cshtml:
@{
ViewBag.Title = "Reports";
}
@*@section title{ Izenda }*@
@*@section customHeader{}*@
@section scripts
{
<script type="text/javascript">
$(document).ready(function () {
izendaInitReport();
});
</script>
}
<div class="loader" id="progressLoader"> </div>
<div class="izenda-container" id="izenda-root"></div>
Embedding the Izenda Report Designer Page
Create the ReportDesigner action in HomeController
public ActionResult ReportDesigner()
{
return View();
}
The report designer view ReportDesigner.cshtml:
@{
ViewBag.Title = "Report Designer";
}
@*@section title{ Izenda }*@
@*@section customHeader{}*@
@section scripts
{
<script type="text/javascript">
$(document).ready(function () {
izendaInitReportDesigner();
});
</script>
}
<div class="loader" id="progressLoader"> </div>
<div class="izenda-container" id="izenda-root"></div>
Report Part for Exporting
This action is not displayed directly to the end-users. It is used for rendering report parts (charts, gauges, and maps) for exporting. Reports containing these report part types must be rendered to capture html content then converted it to image when creating exported material (pdf, word, excel, etc.).
This view is requested by Izenda backend over the route url viewer/reportpart/{id} in route config ~\View_Start\RouteConfig.cs.
Add the ReportPart action in HomeController:
public ActionResult ReportPart(Guid id, string token)
{
ViewBag.Id = id;
ViewBag.Token = token;
return View();
}
This view is only used by Izenda backend, so it requires a minimal view containing only the report part content. Create a new simple layout named _IzendaLayout.cshtml. This layout does not contain UI for menu item, signed in user information.
The _IzendaLayout.cshtml content:
<!DOCTYPE html>
<html>
<head>
<meta charset="utf-8" />
<meta name="viewport" content="width=device-width, initial-scale=1.0">
<title>@ViewBag.Title - My ASP.NET Application</title>
@Styles.Render("~/Content/css")
@Scripts.Render("~/bundles/modernizr")
@* Apply css based on the users tenant *@
<link href="~/Scripts/izenda/izenda-ui.css" rel="stylesheet">
</head>
<body>
<div class="container-fluid body-content">
@RenderBody()
</div>
@Scripts.Render("~/bundles/jquery")
@Scripts.Render("~/bundles/bootstrap")
@* #izenda *@
<script src="~/Scripts/alertify.js"></script>
@Scripts.Render("~/bundles/izenda")
    <script type="text/javascript">
        $(document).ready(function () {
            DoIzendaConfig();
            $('[data-toggle="tooltip"]').tooltip();
            $('[data-toggle="dropdown"]').dropdown();
            $("#reportPartLoader").hide();
            $("#reportPartLoaderText").hide();
        });
    </script>
@RenderSection("scripts", required: false)
</body>
</html>
The ReportPart.cshtml content:
@{
    Layout = "~/Views/Shared/Izenda_Layout.cshtml";
    ViewBag.Title = "Report Viewer";
}
@section scripts
{
    <script type="text/javascript">
        $(document).ready(function () {
            izendaInitReportPartExportViewer('@ViewBag.Id', '@ViewBag.Token');
           // $('#izenda-root').children().first().removeClass('izenda');
            //var classList = $('#izenda-root').children().first().attr('class').split(/\s+/);
            //$.each(classList, function (index, item) {
            //    console.log(item);
            //});

        });
    </script>
}
<style>
    #izenda-root > .izenda {
        background-color: transparent !important;
    }
</style>
<div class="izenda-container" id="izenda-root" style="margin-top:0px;"></div>
Embedding the Report Viewer
Create the ReportController and add a new action named ReportViewer:
        // show report Viewer by id
        public ActionResult ReportViewer(string id)
        {
            ViewBag.Id = id;
            return View();
        }
Create the view ReportViewer.cshtml:
@{
    ViewBag.Title = "Report Viewer";
}
@section scripts
    {
    <script type="text/javascript">
    $(document).ready(function () {
        var overridingFilterQueries = JSON.parse('@Html.Raw(System.Net.WebUtility.HtmlDecode(ViewBag.overridingFilterQueries))');
        izendaInitReportViewer('@ViewBag.Id', {
          overridingFilterValue: overridingFilterQueries
        }
      );
    });
    </script>
}
<div class="loader" id="progressLoader"> </div>
<div class="izenda-container" id="izenda-root"></div>
Note that this page also used by Izenda backend in function to export report html content when user wants to send a report via email (directly or over subscription scheduler). The Izenda backend uses the route report/view/{id} to get report content, then in RouteConfig.cs we have a custom route for this. You must ensure your report viewer page has the same controller and action with the custom route ReportViewer.
            routes.MapRoute(
                name: "ReportViewer",
                url: "report/view/{id}",
                defaults: new { controller = "Report", action = "ReportViewer" }
            );
Embedding Report Parts
This page demonstrates how to display multiple report parts on a page outside of the Report Viewer. The function izendaInitReportPartDemo in ~\wwwroot\js\izenda.integrate.js is implemented to handle this.
// Render report parts to specific <div> tag by report part id
var izendaInitReportPartDemo = function () {

    function successFunc(data, status) {
        console.info(data);
        var currentUserContext = {
            token: data.token
        };

        // You can add report parts after creating reports using the context below
        // Add the report part ID's in the [your report nth id] area
        IzendaSynergy.setCurrentUserContext(currentUserContext);
        IzendaSynergy.renderReportPart(document.getElementById('izenda-report-part1'), {
            "id": "[your report 1st id]",
        });

        IzendaSynergy.renderReportPart(document.getElementById('izenda-report-part2'), {
            "id": "[your report 2nd id]",
        });

        IzendaSynergy.renderReportPart(document.getElementById('izenda-report-part3'), {
            "id": ""[your report 3rd id]"
        });
    }
    this.DoRender(successFunc);
};
In the ReportController create the action ReportParts:
        public ActionResult ReportParts()
        {
            return View();
        }
Create the ReportParts.cshtml view:
@{
    ViewBag.Title = "Report Parts";
}

@section scripts
    {
    <script type="text/javascript">
        $(document).ready(function () {
            izendaInitReportPartDemo();
        });
    </script>
}
<style>
    .report-part-chart {
        float: left;
        width: 40%;
        height: 40%;
        margin-left: 20px;
        margin-top: 20px;
        background-color: white;
    }

    .report-part-grid {
        float: left;
        width: 40%;
        height: 50%;
        margin-left: 20px;
        margin-top: 20px;
        background-color: white;
    }
</style>

<div class="loader" id="reportPartLoader"> </div>
<div class="izenda-container">
    <div class="report-part-chart" id="izenda-report-part1"></div>
    <div class="report-part-chart" id="izenda-report-part2"></div>
    <div class="report-part-grid" id="izenda-report-part3"></div>
</div>
Embedding the Dashboard
Dashboard List
This page displays the dashboard list.
In the HomeController create the action Dashboards:
        public ActionResult Dashboards()
        {
            return View();
        }
Create the Dashboards.cshtml view:
@{
    ViewBag.Title = "Dashboards";
}

@*@section title{ Izenda }*@
@*@section customHeader{}*@
@section scripts
{

    <script type="text/javascript">
        $(document).ready(function () {
            izendaInitDashboard();
        });
    </script>
}

<div class="loader" id="progressLoader"> </div>
<div class="izenda-container" id="izenda-root"></div>
New Dashboard
The page for creating a new dashboard.
In the HomeController create the action DashboardDesigner:
        public ActionResult DashboardDesigner()
        {
            return View();
        }
Create the DashboardDesigner.cshtml view:
@{
    ViewBag.Title = "Dashboard Designer";
}

@section scripts
{
    <script type="text/javascript">
        $(document).ready(function () {
            izendaInitNewDashboard();
        });
    </script>
}

<div class="loader" id="progressLoader"> </div>
<div class="izenda-container" id="izenda-root"></div>
Dashboard Viewer
Display detail of dashboard, this page also is requested by Izenda backend for dashboard exporting function over route dashboard/view/{id}. In RouteConfig.cs we have a custom route named DashboardViewer, this custom route will map to the controller and view of this page.
Create the DashboardController and action DashboardViewer:
using Microsoft.AspNetCore.Mvc;
using MVCCoreStarterKit.Attributes;
using Newtonsoft.Json;
using System;
using System.Collections.Generic;

namespace MVCCoreStarterKit.Controllers
{
    public class DashboardController : Controller
    {
        [Theme]
        public IActionResult DashboardViewer(string id)
        {
            var query = Request.Query;
            dynamic filters = new System.Dynamic.ExpandoObject();
            foreach (string key in query.Keys)
            {
                ((IDictionary<string, Object>)filters).Add(key, query[key]);
            }

            ViewBag.Id = id;
            ViewBag.filters = JsonConvert.SerializeObject(filters);
            return View();
        }
    }
}
Create the DashboardViewer.cshtml view:
@{
    ViewBag.Title = "Dashboard Viewer";
}

@section scripts
    {
    <script type="text/javascript">
        $(document).ready(function () {
            var filters = JSON.parse('@Html.Raw(System.Net.WebUtility.HtmlDecode(ViewBag.filters))');
            izendaInitDashboardViewer('@ViewBag.Id', filters);
        });
    </script>
}

<div class="loader" id="progressLoader"> </div>
<div class="izenda-container" id="izenda-root"></div>
Run Your Izenda Integrated Application
Press F5 to run debug
Navigate to login page and enter the values below for the respective fields:
- Tenant = System
- Email = IzendaAdmin@system.com
- Password = Izenda@123
On top menu click Settings link then add your license key
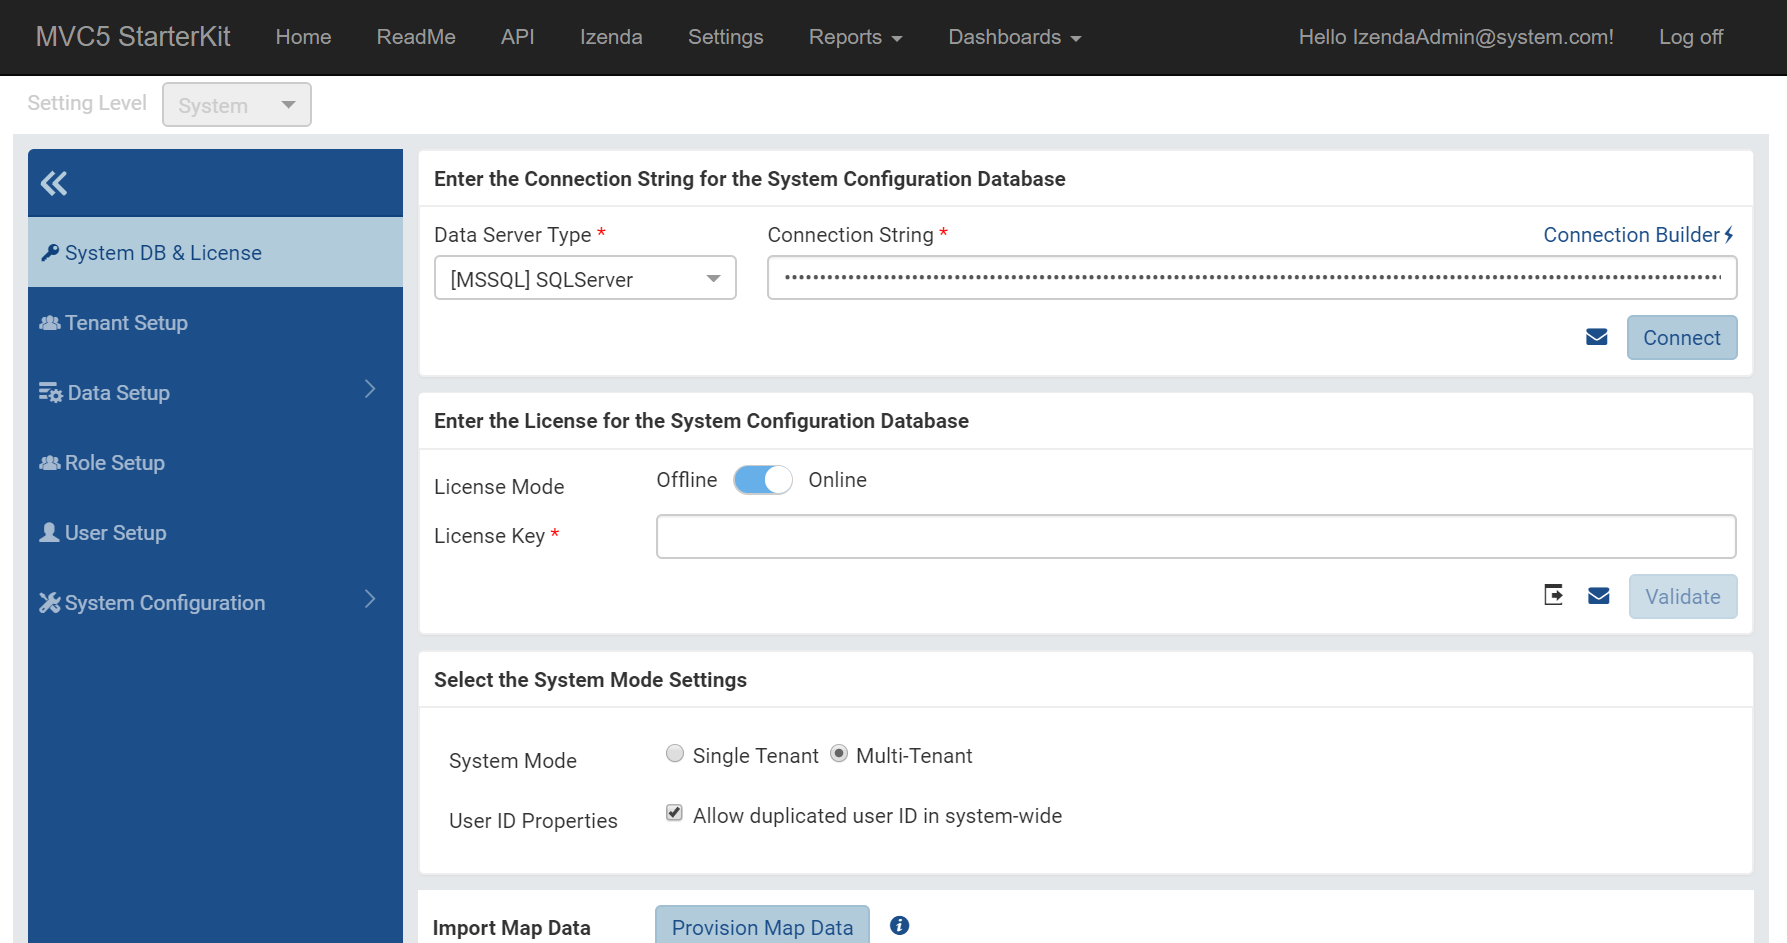
Settings license key
Stop your application and start again (this step ensures Izenda reloads the cache).
Click Izenda link on top menu to open full Izenda app
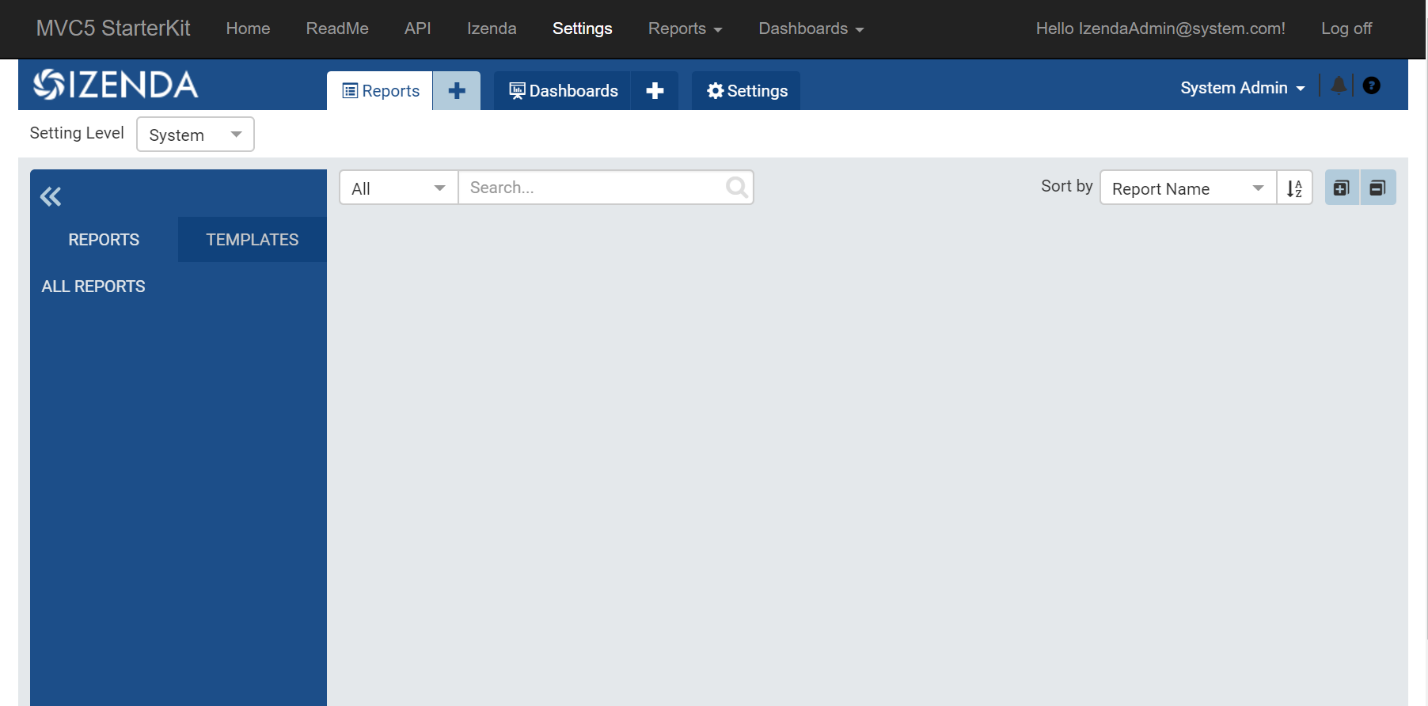
Full Izenda app
Now feel free to explore Izenda integrated application.
Implement Register New Account
Modify register new user layout in ASP.NET MVC Core
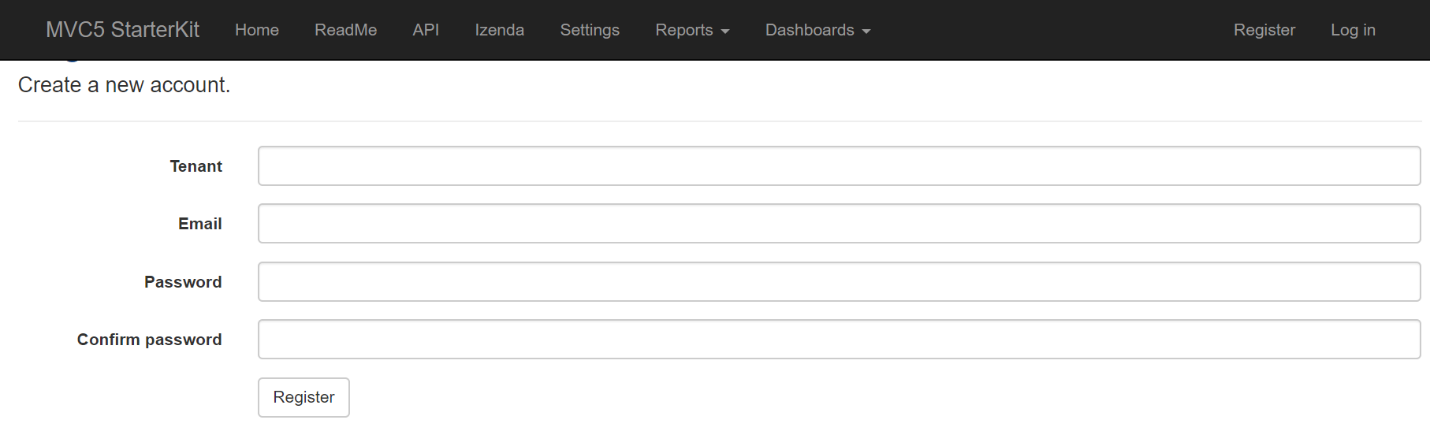
New account screen
Add new class InputModel in ~\Areas\Identity\Pages\Account\Register.cshtml.cs
        public class InputModel
        {
            [Required]
            [DataType(DataType.Text)]
            [Display(Name = "Tenant")]
            public string Tenant { get; set; }

            [Required]
            [EmailAddress]
            [Display(Name = "Email")]
            public string Email { get; set; }

            [Required]
            [StringLength(100, ErrorMessage = "The {0} must be at least {2} and at max {1} characters long.", MinimumLength = 6)]
            [DataType(DataType.Password)]
            [Display(Name = "Password")]
            public string Password { get; set; }

            [DataType(DataType.Password)]
            [Display(Name = "Confirm password")]
            [Compare("Password", ErrorMessage = "The password and confirmation password do not match.")]
            public string ConfirmPassword { get; set; }
        }
Add new tenant input element into ~\Areas\Identity\Pages\Account\Register.cshtml
<div class="row">
    <div class="col-md-4">
        <form asp-route-returnUrl="@Model.ReturnUrl" method="post">
            <h4>Create a new account.</h4>
            <hr />
            <div asp-validation-summary="All" class="text-danger"></div>
            <div class="form-group">
                <label asp-for="Input.Tenant"></label>
                <input asp-for="Input.Tenant" class="form-control" />
                <span asp-validation-for="Input.Tenant" class="text-danger"></span>
            </div>
            <div class="form-group">
                <label asp-for="Input.Email"></label>
                <input asp-for="Input.Email" class="form-control" />
                <span asp-validation-for="Input.Email" class="text-danger"></span>
            </div>
            <div class="form-group">
                <label asp-for="Input.Password"></label>
                <input asp-for="Input.Password" class="form-control" />
                <span asp-validation-for="Input.Password" class="text-danger"></span>
            </div>
            <div class="form-group">
                <label asp-for="Input.ConfirmPassword"></label>
                <input asp-for="Input.ConfirmPassword" class="form-control" />
                <span asp-validation-for="Input.ConfirmPassword" class="text-danger"></span>
            </div>
            <button type="submit" class="btn btn-primary">Register</button>
        </form>
    </div>
</div>
Create Services folder and Add new TenantManager class to project (~\Services\TenantManager.cs), this class is used to get Tenant and create new tenant info from your authentication DB.
using MVCCoreStarterKit.Areas.Identity.Model;
using MVCCoreStarterKit.Data;
using System;
using System.Linq;
using System.Threading.Tasks;

namespace MVCCoreStarterKit.Services
{
    public interface ITenantManager
    {
        Tenant GetTenantByName(string name);
        Task<Tenant> SaveTenantAsync(Tenant tenant);
    }

    public class TenantManager : ITenantManager
    {
        private readonly ApplicationDbContext dbContext;

        public TenantManager(ApplicationDbContext dbContext)
        {
            this.dbContext = dbContext;
        }

        public Tenant GetTenantByName(string name)
        {
            var tenant = dbContext.Tenants.Where(x => x.Name.Equals(name, StringComparison.InvariantCultureIgnoreCase)).SingleOrDefault();
            return tenant;
        }


        public async Task<Tenant> SaveTenantAsync(Tenant tenant)
        {
            dbContext.Tenants.Add(tenant);
            await dbContext.SaveChangesAsync();

            return tenant;
        }
    }
}
Open Areas\Identity\Pages\Account\Register.cshtml.cs and modify OnPostAsync action to handle new user registration logic.
When registering a new user the new user’s information is stored on both the authentication DB and the Izenda DB, following that we split the registration logic into the steps below:
- Save new Tenant if needed
- Save User and Role in authentication DB
- Save User and Role in Izenda DB
- Sign in with new user
All step are encapsulated in the Register action in AccountController.
Register tenant:
var tenant = await HandleTenant(Input.Tenant);
Save user and role information into authentication DB:
                var user = new IzendaUser { Tenant_Id = tenant.Id, UserName = Input.Email, Email = Input.Email };
                var result = await userManager.CreateAsync(user, Input.Password);
                await userManager.AddToRoleAsync(user, roleName);
Save user and role into IzendaDB:
                if (result.Succeeded)
                {
                    logger.LogInformation("User created a new account with password.");
                    //determine tenant
                    Tenants izendaTenant = null;
                    if (!IsSystemTenant(tenant.Name))
                    {
                        izendaTenant = new Tenants();
                        izendaTenant.Active = true;
                        izendaTenant.Deleted = false;

                        izendaTenant.Name = tenant.Name;
                        izendaTenant.TenantID = tenant.Name;
                        TenantIntegrationConfig.AddOrUpdateTenant(izendaTenant);
                    }

                    //determine roles
                    var roleDetail = new RoleDetail()
                    {
                        Name = roleName,
                        TenantUniqueName = tenant.Name,
                        Active = true,
                        Permission = new Izenda.BI.Framework.Models.Permissions.Permission(),
                    };

                    var izendaUser = new UserDetail()
                    {
                        UserName = user.Email,
                        EmailAddress = user.Email,
                        FirstName = "John", //todo fix this
                        LastName = "Doe",
                        TenantDisplayId = izendaTenant?.Name,
                        SystemAdmin = IsSystemTenant(tenant.Name),
                        Deleted = false,
                        Active = true,
                        Roles = new List<Role>()
                    };

                    izendaUser.Roles.Add(new Role()
                    {
                        Name = roleDetail.Name
                    });

                    RoleIntegrationConfig.AddOrUpdateRole(roleDetail);
                    UserIntegrationConfig.AddOrUpdateUser(izendaUser);
Login with newly created user:
                    await signInManager.SignInAsync(user, isPersistent: false);
                    return LocalRedirect(returnUrl);
You can refer to completed implementation of Register in Register.chtml.cs on Github here.
Call Izenda API Service in C#
On completed sample starter kit on Github, we provide an example demonstrating how to call Izenda API service in C# code, reference to the ~\IzendaBoundary\WebAPIService.cs and ~\IzendaBoundary\IzendaUtility.cs for more detail.