Report Designer/Access
The Report Designer/Access page allows user to
- view and change report owner
- view list of sharings
- add and remove sharings
View List of Sharings
Open an existing report if not already open.
Click Access in the left menu.
Report’s current sharings will be listed, showing the people being shared with and the access rights.
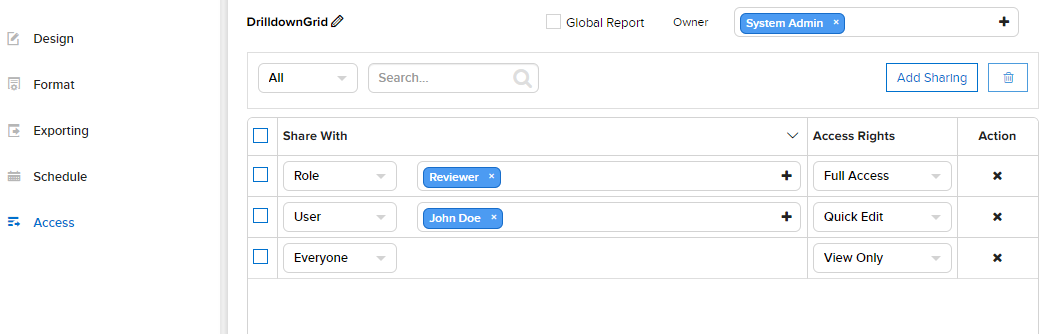
Fig. 224 Report Designer - Access
To remove sharings:
- To remove a sharing, click the remove icon (x) at the end of that row.
- To remove multiple sharings at the same time, tick the check-box in front of each row, then click the Remove Selected icon (that looks like a waste basket).
User can also edit the sharings, then click Save at the top to save.
For details of a sharing, see Add a Sharing section.
Add a Sharing
Click the Add Sharing button above the list to add a new row in the list:
Select the type of user group to share with: Everyone, Role, User or Tenant (for Global reports only).
Select the specific Tenant, Role or User (not applied for Everyone option).
For Tenant, click the plus icon to open Select Tenant pop-up.

- Select one or more tenants or tenant groups.
- Click OK to close the pop-up.
For Role, click the plus icon to open All Roles pop-up.
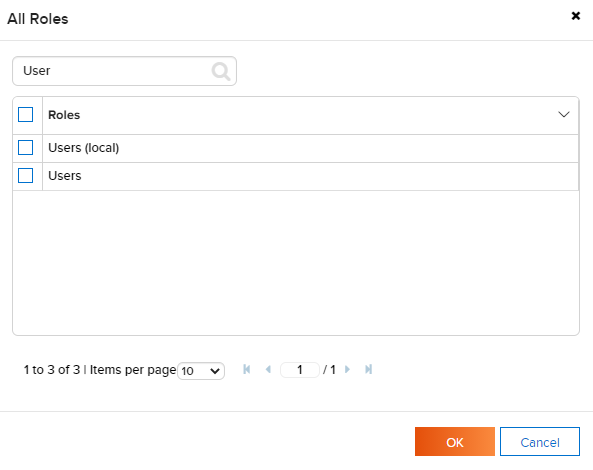
- Type a partial name into the search box and click the search icon (🔍).
- Only matching roles will be displayed.
- Select one or more roles then click OK to close the pop-up.
For User, click the plus icon to open All User pop-up.
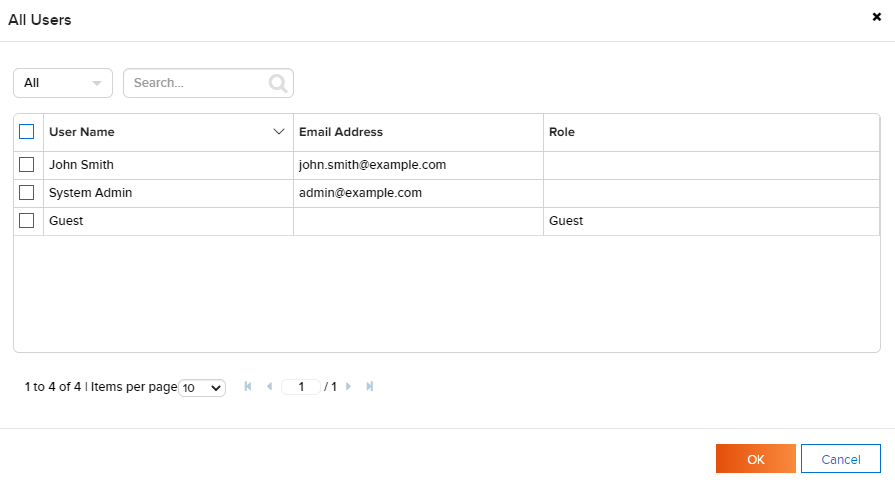
- Select either User Name, Email Address or Role to search for. Select All to search for all fields.
- Type a partial name into the search box and click the search icon (🔍).
- Only matching users will be displayed.
- Select one or more users then click OK to close the pop-up.
Select an Access Right (See details in List of Access Rights table below).
Click Save button at the top to save the list.
| Share With Value | Specific User | Specific Role | Specific Tenant or Tenant Group | Everyone |
|---|---|---|---|---|
| Interaction | All roles of User | This Role | All roles of tenant/tenant group (for Global reports only) |
All roles of tenant/system |
| Interact with shared report |
Full Access | Quick Edit | Save As | Locked | View Only | No Access |
|---|---|---|---|---|---|---|
| View the report with filter interaction | ✔ | ✔ | ✔ | ✖ | ✔ | ✖ |
| View the report with NO filter interaction | ✖ | ✖ | ✖ | ✔ | ✖ | ✖ |
| Modify the report in Quick Edit mode | ✔ | ✔ | ✔ | ✖ | ✖ | ✖ |
| Modify the report in Report Designer | ✔ | ✖ | ✔ | ✖ | ✖ | ✖ |
| Save changes in the report | ✔ | ✖ | ✖ | ✖ | ✖ | ✖ |
| Save As changes in the report | ✔ | ✔ | ✔ | ✖ | ✖ | ✖ |
| Access Right | Full Access | Quick Edit | Save As | Locked | View Only | No Access |
|---|---|---|---|---|---|---|
| Visible Category | ✔ | ✔ | ✔ | ✔ | ✔ | ✖ |
| Categories allowed for saving reports | ✔ | ✖ | ✖ | ✖ | ✖ | ✖ |
| Access Right |
|---|
| Full Access |
| Save As |
| Quick Edit |
| Locked |
| View Only |
| No Access |
View and Change Report Owner
The Report Owner is displayed next to the report name.
To change Report Owner:
- Click the plus icon to open All Users pop-up.
- Select either User Name, Email Address or Role to search for. Select All to search for all fields.
- Type a partial name into the search box and click the search icon (🔍).
- Only matching users will be displayed.
- Select the user then click OK to close the pop-up.
- Click Save button at the top to save the report together with the owner.