White-Labeling Izenda
CSS Overrides
Most white-labeling can be accomplished via CSS overrides in a custom css file.
Creating the custom CSS file
Create a new CSS file “customizations.css”.
Deploy the file to the web front-end.
Edit the index.html file to include the new CSS file as shown below at line 21.
 1
 2
 3
 4
 5
 6
 7
 8
 9
10
11
12
13
14
15
16
17
18
19
20
21
22
23
24
25
26
27
28
29
30
31
32
33
34
35
36
37
38
39
<!DOCTYPE html>
<html>

<head>
  <title>Izenda BI Platform</title>

  <meta http-equiv="Content-Type" content="text/html; charset=UTF-8" />
  <meta http-equiv="X-UA-Compatible" content="IE=edge,chrome=1">
  <meta content='width=device-width, initial-scale=1.0, maximum-scale=1.0, user-scalable=0' name='viewport' />

  <style>
                .container {
                  width: 100%;
                  height: 100vh;
                  min-height: 100vh;
                }
                @media print {
                  .container {
                        height: auto;
                        min-height: inherit;
                  }
                }
  </style>

<link rel="shortcut icon" href="/favicon.png">
<link href="/izenda-ui.css?1c44f40f9366b0787b1f" rel="stylesheet">
<link href="/customizations.css" rel="stylesheet">
</head>

<body>
        <div class="container" id="izenda-root"></div>
        <script type="text/javascript" src="/izenda_common.js?1c44f40f9366b0787b1f"></script>
        <script type="text/javascript" src="/izenda_config.js?1c44f40f9366b0787b1f"></script>
        <script type="text/javascript" src="/izenda_locales.js?1c44f40f9366b0787b1f"></script>
        <script type="text/javascript" src="/izenda_vendors.js?1c44f40f9366b0787b1f"></script>
        <script type="text/javascript" src="/izenda_ui.js?1c44f40f9366b0787b1f"></script>
</body>

</html>
Save the changes and optionally restart the front-end site.
Common Examples
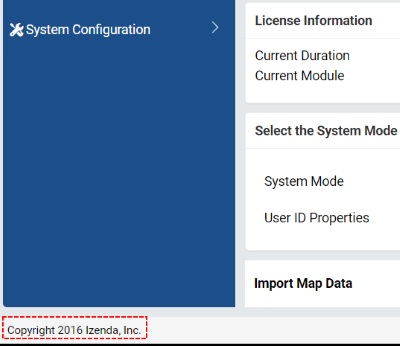
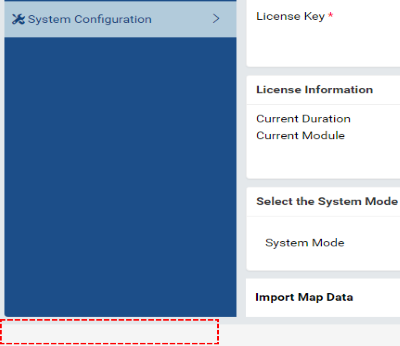
Removing the Izenda Copyright notice
Update the customizations.css file to include the CSS below:
1
2
3
.izenda-Footer .izenda-Footer-copyright {
        visibility: hidden;
}
Before:
After:
Removing the Izenda help icon
Update the customizations.css file to include the CSS below:
1
2
3
.icon-help-circled:before {
        visibility: hidden;
}