Izenda Copy Console
Introduction
The Izenda Copy Console Tool will allow you to copy templates, reports and dashboards from one Izenda Configuration database to another. If you need to copy reports within the same configuration database (eg. copying a report from one tenant to another) you can use the Copy Management Tool.
Understanding the Security of the Copy Console
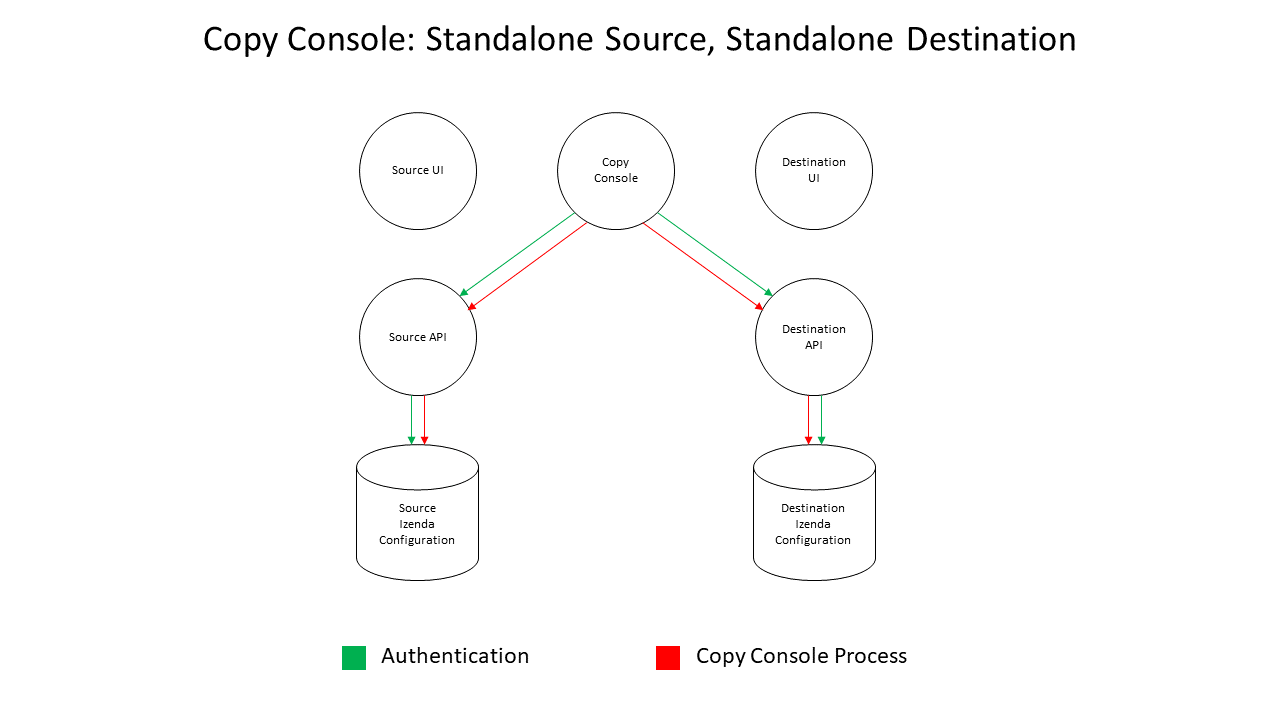
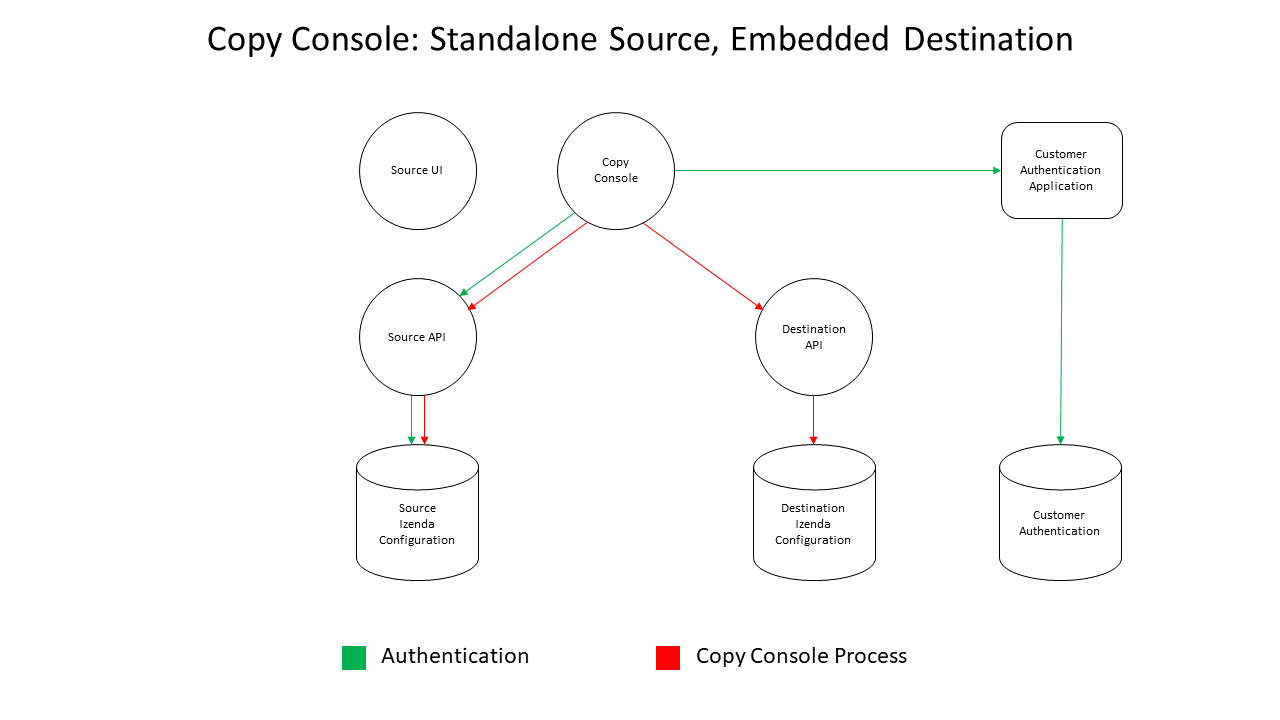
Copy Console Authentication Overview
The Copy Console application must be able to log in to Izenda in order to create a valid access token.
For standalone environments, you will simply need to provide the Izenda API URL along with valid credentials for your source and destinations. The Copy Console will use the standalone authentication endpoints to create a valid access token for the copy process.
For integrated environments, the Copy Console must be able to login to host application and, therefore, it will need to utilize your security standards for authenticating users outside of a Web Browser.
Data Transfered Via Copy Console
The following guidelines provide an overview of what the copy console can copy from one environment to another. In the subsequent documentation, dashboards, reports, and templates will be collectively referred to as Report Objects.
- Reporting Data: No
- Report Structure (report layout, charts, printing defaults): Yes
- Dashboard Structure: Yes
- Access Rights:
- User Level: No
- Role Level: Yes, with role mapping in XML
- Everyone: Yes
- Schedules/Subscriptions: No
- Filter Values: No
- Filter Values will not be copied from source to destination because the stored data may pose a security concern. In the destination, the filter values will need to be reapplied. If a report contains a non-visible required filter and is copied, an error message will be displayed when you navigate to the report. You will simply need to open the report in the designer, specify a value, and save the report.
- Calculated Fields: Yes/No.
- If the calculated field is created in the report, it will be copied. If the calculated field is created within the data model level, it will not be copied.
- Tenants, Roles, Users, Permissions: No
- Report Object GUIDs: No
Report Object Workflow
The following guidelines specify the intended workflow when copying dashboards, reports, and templates from one environment to another.
- Report Objects can be copied from Source System to Destination System
- Report Objects can be copied from Source System to Destination Tenant
- Report Objects can be copied from Source Tenant to Destination Tenant
- Report Objects cannot be promoted from a Tenant to a System
Copy Console Examples
- In the following examples, we assume that each reports are found in the same category and sub category.
- Reports are described using their Report Name, GUID, and Source GUID {Report Name, GUID, Source GUID}
- In live scenarios, GUIDs are not generated sequentially
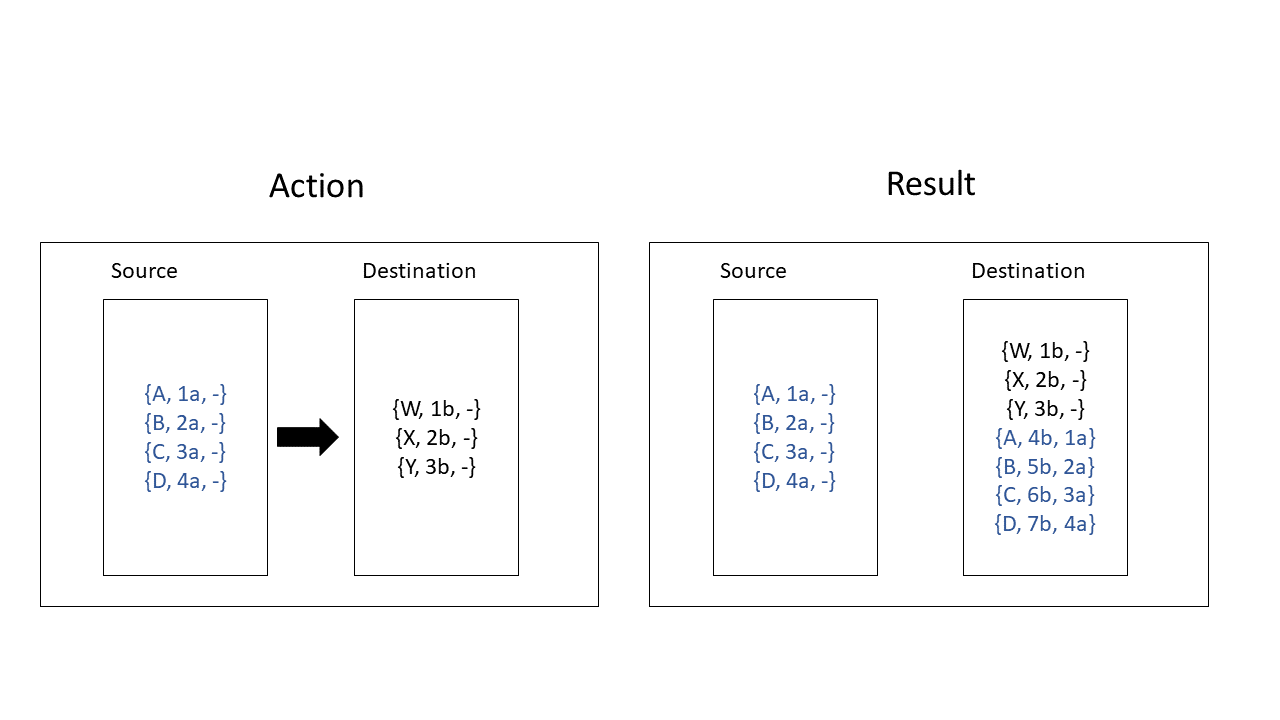
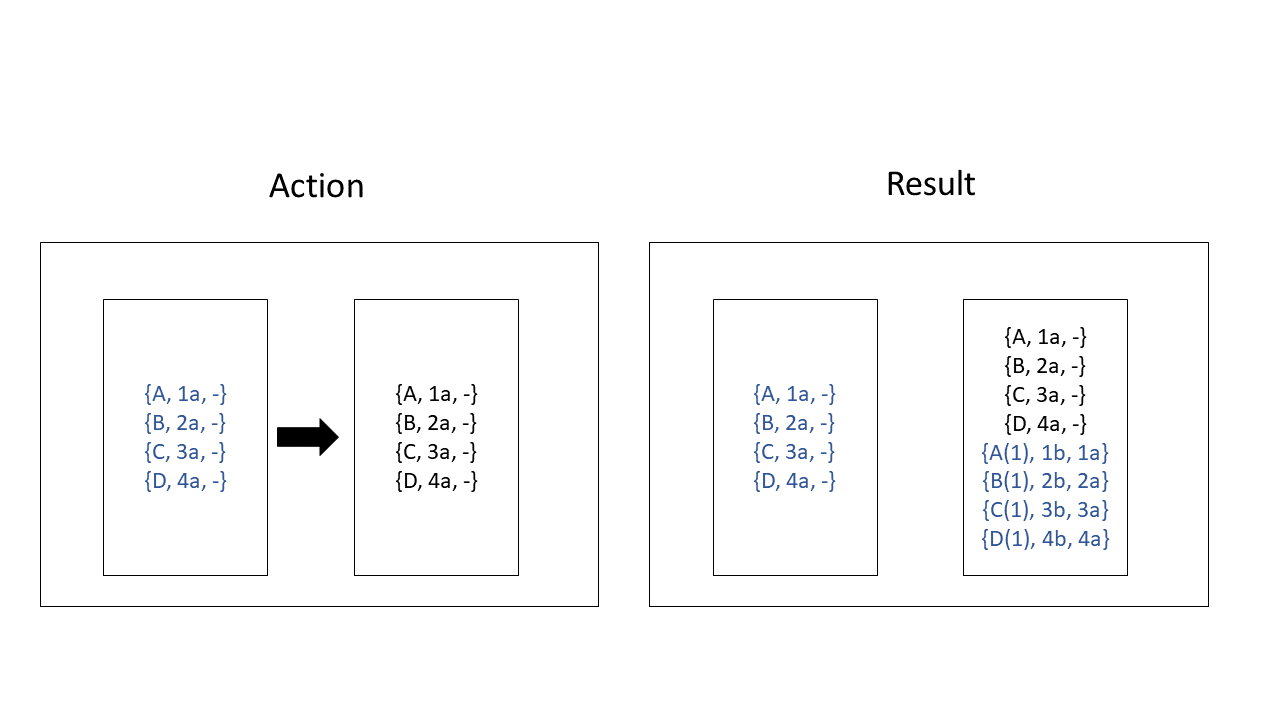
Goal: Copy reports A, B, C, D from Source to Destination
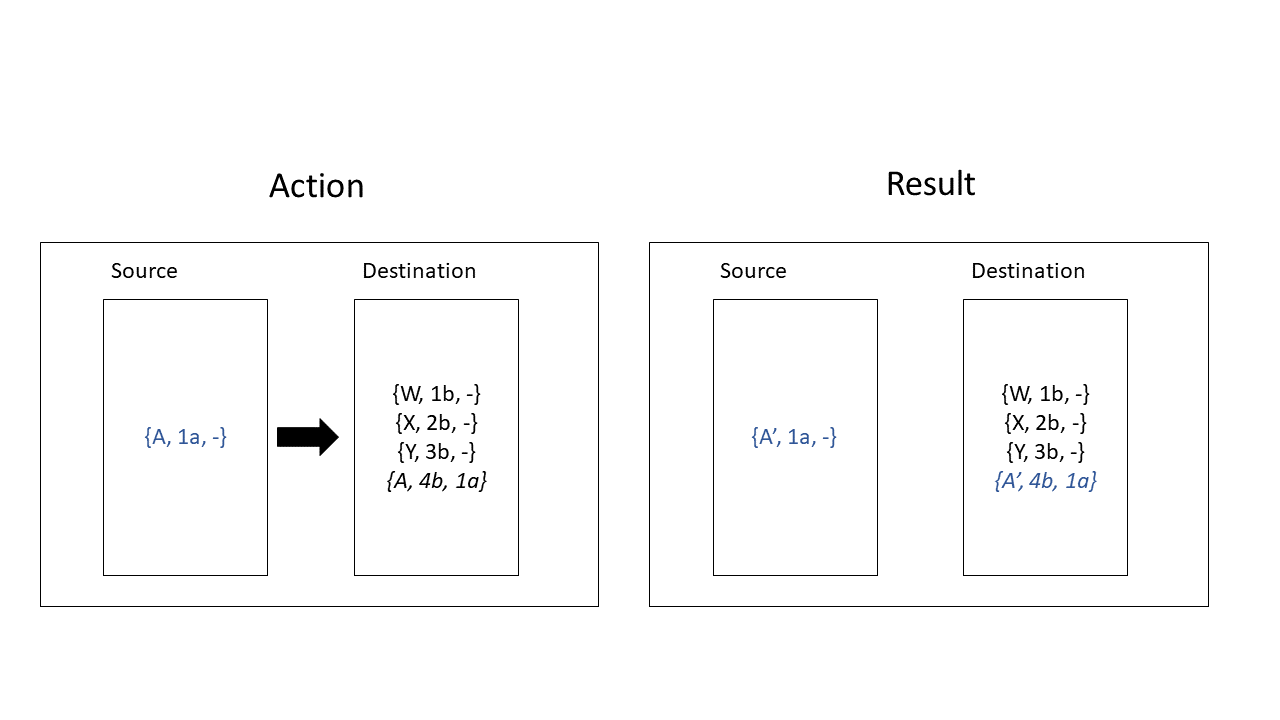
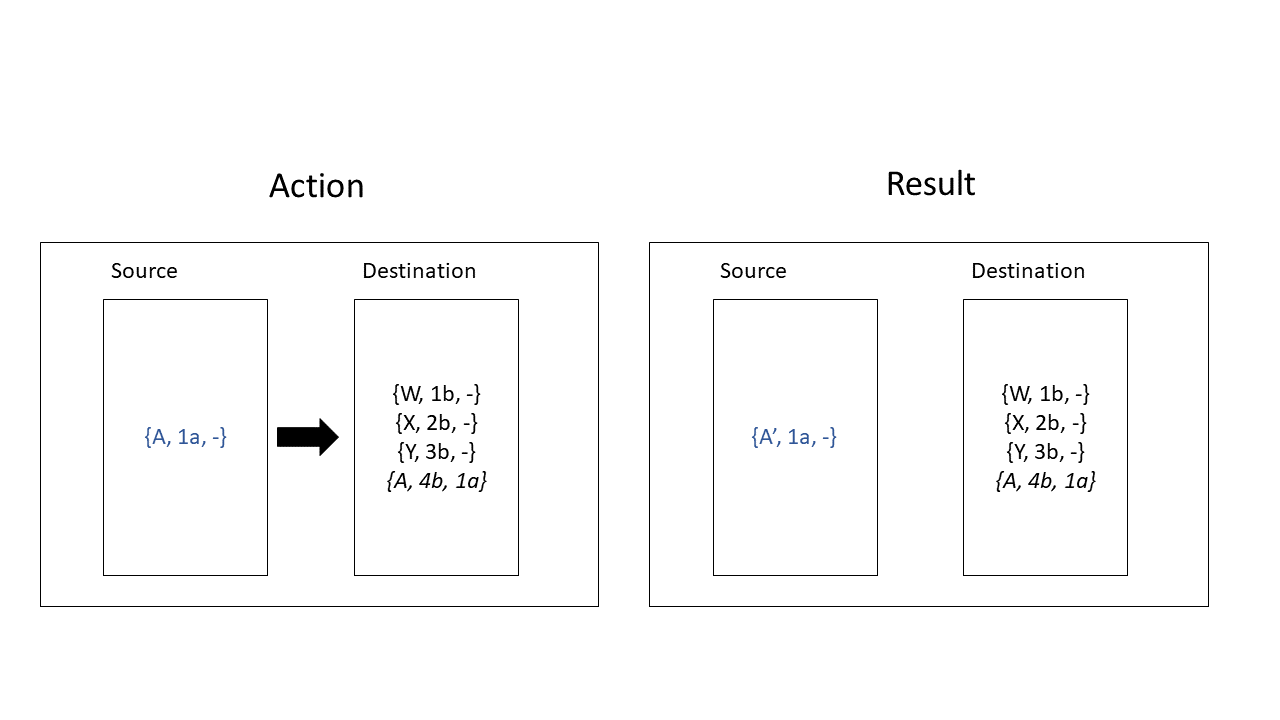
Goal: Report A has been copied from Source to Destination. Modify report A in Source and recopy. Overwrite if exists = yes
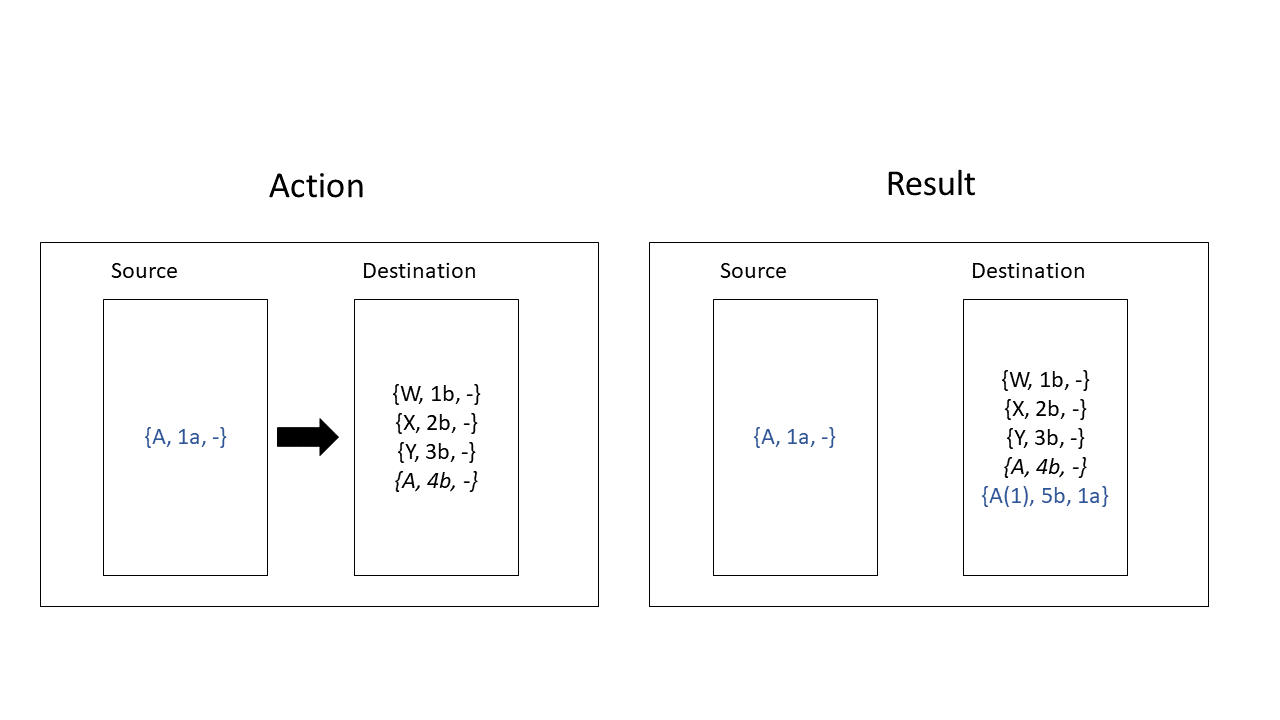
Goal: Report A has been copied from Source to Destination. Modify report A in Source and recopy. Overwrite if exists = no
Goal: Report A name exists in destination. Create report A in Source and Copy. Overwrite if exists = no
Goal: Report A name exists in destination. Create report A in Source and Copy. Overwrite if exists = no
Goal: The destination database is a restored copy of the source database. Reports have been modified in source.
Copy modified reports A, B, C, D from source to destination. Overwrite if exists = no
- Goal: The destination database is a restored copy of the source database. Reports have been modified in source.
Copy modified reports A, B, C, D from source to destination. Overwrite if exists = yes
Understanding The Copy Console XML
Options for the Copy Console are specified in an XML and provided to the Copy Console at runtime. An example of this XML can be found in the “Usage” section below. The following is an overview of the configurable options in your XML.
Authentication: The Copy Console must be able to log in to Izenda in order to create a valid access token.
- For standalone environments, you will simply need to provide the Izenda API URL along with valid credentials for your source and destinations.
- In integrated modes, the authentication endpoint will be specified in the appAuthUrl of the Authentication object. A sample C# implementation can be found in the Using the Copy Console for Integrated Modes section below.
Specifying a Tenant:Tenants are specified directly in your CopyConfig.xml by their ID found within the UI. If the Tenant ID value is left blank, it is assumed that you are copying to the System “tenant”
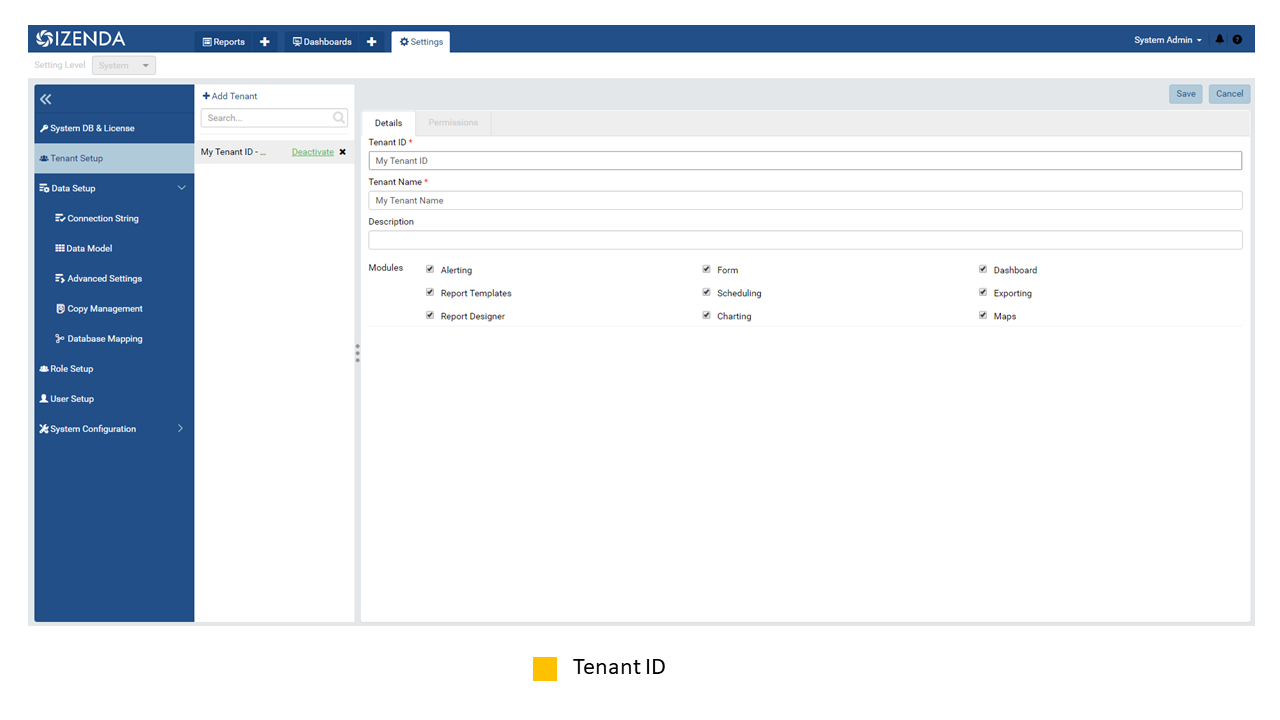
Fig. 153 <tenant id=”My Tenant ID” overwriteIfAlreadyExist=”yes”>
- Specifying the overwriteIfExists Flag: When a report is copied from one environment to another, a Source ID is cataloged in the destination. This control can be set at the tenant level within your configuraton file.
<tenant id=”My Tenant ID” overwriteIfAlreadyExist=”yes”>
- If flag is true: If the Source ID in the database matches the Source ID of the prospective copy and the report names match, the existing version of the report is overwritten.
- If flag is false: If the Source ID in the database matches the Source ID of the prospective copy and the report names match, the existing version of the report is not overwritten.
- At this time, there is not a setting to “make a copy” but not overwrite if the SourceIDs match and the names match (e.g. If “Report” exists, “Report(1)” is created).
- Specifying Database Mappings: In order to copy reports from one environment to another, a datasource must exist within the Destination that maps. Database mapping can be accomplished by specifying the source and destination’s database names.
- When specifying your database mapping, you will need to obtain the database name and schema for both the source and destination. Both values can be found directly in the platform.
- Database Objects used within your report must exist in both the source and destination. Database objects are not “mappable.” For instance, if a report is built with the “Orders” table in the Source, it cannot be mapped to an “Orders” view in the Destination. Similarly, if a report is build with the “Orders” table in the Source, it cannot be mapped to a “MyOrdersTable” in the Destination.
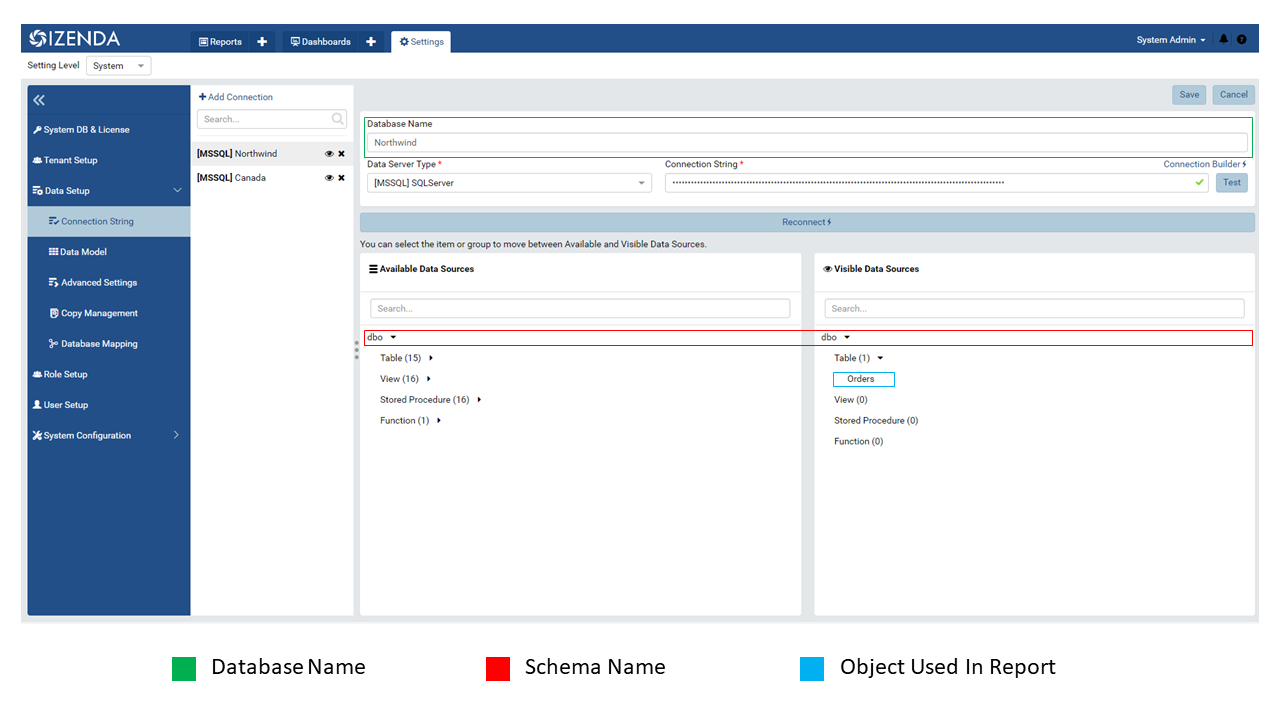
Fig. 154 <databaseMapping sourceDatabaseName=”Northwind” sourceSchema=”dbo” destinationDatabaseName=”NW” destinationSchema=”dbo”/>
Specifying Reports, Templates and Dashboards: These elements will be found in their respective XML tags within your CopyConfig.xml.
To reference a particular Report Object in your XML, you will specify its ID with its corresponding object type
Report Object IDs can be found within the URL when navigating to it in your web browser.
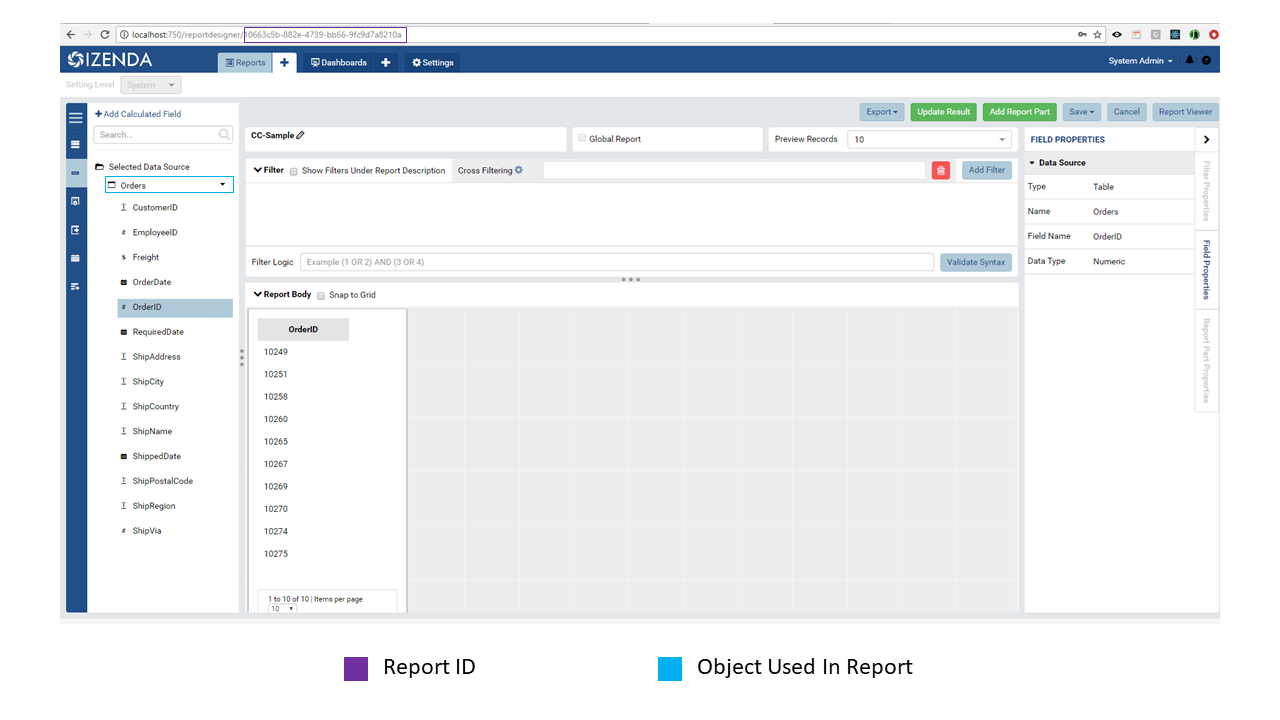
Fig. 155 <report id=”10663c5b-882e-4739-bb66-9fc9d7a8210a”/>
Report/template IDs can also be found within the IzendaReport table of your Izenda Configuration Database.
Dashboard IDs can also be found within the IzendaDashboard table of your Izenda Configuration Database.
Usage
Download a copy of the CopyConsoleTool.zip that corresponds to your version of Izenda from the Upgrade tab in the Izenda Customer Portal.
Download SampleConfig.xml from https://izenda.com/utilities/SampleConfig.xml
Unzip this application to the location you select.
Edit the SampleConfig.xml using the following as a template:
The Source Block tells the application where you are copying from as below:
<source>
    <!-- Specify the api credentials and the url of the source api-->
    <credentials userName="Admin" password="Admin" apiUrl="http://localhost:2525/api"/>
    <!—Tenant id is not a GUID, but rather the 'Tenant ID' field from the UI. If Tenant ID is BLANK your source location is System Level-->
    <tenant id=""></tenant>
    <!-- Specify the reports to copy based on the report id-->
    <reports>
        <report id="4FA0D1D6-C4B5-435E-99D3-8B059724BE7C"/>
        <report id="41212145-C4B5-435E-99D3-8B059724BHC3"/>
    </reports>
    <!-- Specify the templates to copy using the template id -->
    <templates>
        <!--  <template id="51D71299-FCD0-402E-9DE0-AD428D26FAAA"/> -->
    </templates>
    <!-- Specify the dashboards to copy using the dashboard id-->
    <dashboards>
        <!-- <dashboard id="B68574CC-89EC-462F-9ED8-DF2F12FACC58"/>  -->
    </dashboards>
</source>
Now you can configure the destination(s).
Each destination can have a name, this will allow you to run one or all destinations from the command line (the destination name can be specified using the /d: command and the name).
The destination block can be configured as below:
<!-- Specify the destination(s)-->
<destinations>
   <!-- Destination 1, These destinations can be run one at a time or all at once based on the name given for each destination by using the d:/parameter in the command line-->
   <destination name="UAT">
      <!-- Specify the api credentials -->
      <credentials userName="Admin" password="Admin" apiUrl="http://10.100.5.86:80/api" />
      <!-- Specify the tenant(s)-->
      <tenants>
         <!-- id is not a GUID, but rather the 'Tenant ID' field from the UI. If Tenant ID is BLANK this is System Level. IF you would like to overwrite anything at the destination set overwrite to “yes” if not set to “no”-->
         <tenant id="" overwriteIfAlreadyExist="yes">
            <!-- Specify the database mappings -->
            <databaseMappings>
               <!-- The database name is the name given to to the connection string in the UI of the application. This name is visible in the connection string page of the Izenda Application UI this is not the actual name of the database on your server. You must add the name and the schema for both the source and the destination -->
               <databaseMapping sourceDatabaseName="northwind" sourceSchema="dbo" destinationDatabaseName="northwind" destinationSchema="dbo" />
               <databaseMapping sourceDatabaseName="northwind.100" sourceSchema="northwind" destinationDatabaseName="northwind" destinationSchema="northwind"/>
            </databaseMappings>
            <!-- Specify the role mappings, this is not required but if you need to map a role like IT from system to IT Department at the tenant location you can do so here. This is not required. If the role does not exist at the destination is will not be copied.-->
            <roleMappings>
               <!-- <roleMapping sourceRole="Accounting" destinationRole="Accounting"/> -->
               <!-- <roleMapping sourceRole="IT" destinationRole="IT Department"/> -->
            </roleMappings>
         </tenant>
      </tenants>
   </destination>
   <!-- Destination 2, These destinations can be run one at a time or all at once based on the parameters used in the command line-->
   <destination name="DEV">
      <!-- Specify the api credentials -->
      <credentials userName="Admin" password="Admin" apiUrl="http://10.100.5.87:80/api" />
      <!-- Specify the tenant(s)-->
      <tenants>
         <!-- id is not a guid, but rather the 'Tenant ID' field from the UI. If Tenant ID is BLANK this is System Level-->
         <tenant id="Tenant01" overwriteIfAlreadyExist="yes">
            <!-- Specify the database mappings -->
            <databaseMappings>
               <!-- The database name is the name given to to the connection string in the UI of the applicaiotn -->
               <databaseMapping sourceDatabaseName="southwind" sourceSchema="dbo2" destinationDatabaseName="northwind" destinationSchema="dbo2" />
               <databaseMapping sourceDatabaseName="northwind" sourceSchema="northwind" destinationDatabaseName="northwind" destinationSchema="northwind" />
            </databaseMappings>
            <!-- Specify the role mappings, this is not required but if you need to map a role ex. IT from system to IT Department at the tenant location input here-->
            <roleMappings>
               <!-- <roleMapping sourceRole="Accounting" destinationRole="Accounting"/> -->
               <!-- <roleMapping sourceRole="IT" destinationRole="IT Department"/> -->
            </roleMappings>
         </tenant>
      </tenants>
   </destination>
</destinations>
Once you have configured the xml file you can begin to copy.
You will need to run this from a command window. Navigate to the location of the exe where you unzipped it above. You will need to provide the path to the xml file configured above and the parameter for the destination if used. If this parameter is not used, all destinations will be run.
Command Line example to run:
C:\CopyConsoleV1\CopyConsoleTool>IzendaCopyConsoleApp.exe SampleConfig.xml /d:UATTo view usage at the command line:
C:\CopyConsoleV1\CopyConsoleTool>IzendaCopyConsoleApp.exe /?
Usage: IzendaCopyConsoleApp.exe <path to mapping file> [/d:<destination name>]
Options:
/d:destinationname (Optional) Specify the destination name. If this switch is omitted, all destinations will be copied.
Using the Copy Console for Integrated Modes
In order for the copy console to function properly, it must be able to login to the source and destination sites and retrieve an access token that will be used throught the copy process. By default, the copy console will attempt to authenticate against the “api/user/login” endpoint for each site specified in the copy console configuration file.
Exposing the “api/user/login” endpoint
For integrated modes, you can expose this route in the host application and add the corresponding Action method to handle the authentication. A simple example, along with a sample config file, can be found below:
If you are using an MVC Kit that was not downloaded from the GitHub repository, the following code needs to be added to your RoutConfig.cs file. Refer to the following link for an example: https://github.com/Izenda7Series/Mvc5StarterKit/blob/master/Mvc5StarterKit/App_Start/RouteConfig.cs (Line 23)
 //configure a custom route to handle requests for "api/user/login"
routes.MapRoute(
          name: "CustomAuth",
          url: "api/user/login",
          defaults: new { controller = "Home", action = "CustomAuth" }
      );
Then implement a custom action to process requests for “api/user/login” as seen in the example: https://github.com/Izenda7Series/Mvc5StarterKit/blob/master/Mvc5StarterKit/Controllers/HomeController.cs (Line 548)
The “appAuthUrl” setting (v2.6.12 or greater)
Alternatively, you can explicitly specify the authentication URL for integrated deployments via the “appAuthUrl” setting.
Adding the appAuthUrl
Note
Be sure to include the trailing slash for the appAuthUrl.
        <!-- Specify the api credentials -->
        <credentials
                tenant=""
                userName="myuser"
                password="mypassword"
                apiUrl="http://localhost:2277/api/"
                appAuthUrl="http://localhost:14777/login.aspx/"/>
Configuring the appAuthUrl endpoint
The appAuthUrl endpoint should process requests as shown in the example below:
Note
The snippet below is for demonstration purposes and may be subject to change. The most recent example can always be found here
public ActionResult CustomAuth(string username, string password)
{
    OperationResult authResult;
    var serializerSettings = new JsonSerializerSettings { ContractResolver = new CamelCasePropertyNamesContractResolver() };
    var jsonResult = "";

    //validate login (more complex logic can be added here)
    #warning CAUTION!! Update this method to use your authentication scheme or remove it entirely if the copy console will not be used.
    if (username == "IzendaAdmin@system.com" && password == "Izenda@123")
    {
        var user = new UserInfo { UserName = username, TenantUniqueName = "System" };
        var token = IzendaTokenAuthorization.GetToken(user);

        var accessToken = new IzendaFramework.AccessToken
        {
            CultureName = "en-US",
            Tenant = null,
            IsExpired = false,
            NotifyDuringDay = null,
            DateFormat = "DD/MM/YYYY",
            Token = token
        };

        authResult = new OperationResult { Success = true, Messages = null, Data = accessToken };
        jsonResult = JsonConvert.SerializeObject(authResult, serializerSettings);
        return Content(jsonResult, "application/json");
    }

    authResult = new OperationResult { Success = false, Messages = null, Data = null };
    jsonResult = JsonConvert.SerializeObject(authResult, serializerSettings);
    return Content(jsonResult, "application/json");
}
Warning
Please ensure that the JSON response from your endpoint uses camel casing for the property names as shown below.
{
        "success":true,
        "messages":null,
        "data":{
                        "token":"Tm90aGluZyB0byBzZWUgaGVyZSwgbW92ZSBhbG9uZy4=",
                        "tenant":null,
                        "cultureName":"en-US",
                        "dateFormat":"DD/MM/YYYY",
                        "systemAdmin":false,
                        "isExpired":false,
                        "notifyDuringDay":null
        }
}